Fixfellow
Fixfellow – Tools Store Ecommerce Opencart Template
Thank you for purchasing this theme. If you have any questions that are beyond the scope of this help file, feel free to contact us via our Support ticket system. We will do our best to answer you in shortest of time (24-48 hours usually).
Step 1 : Installation
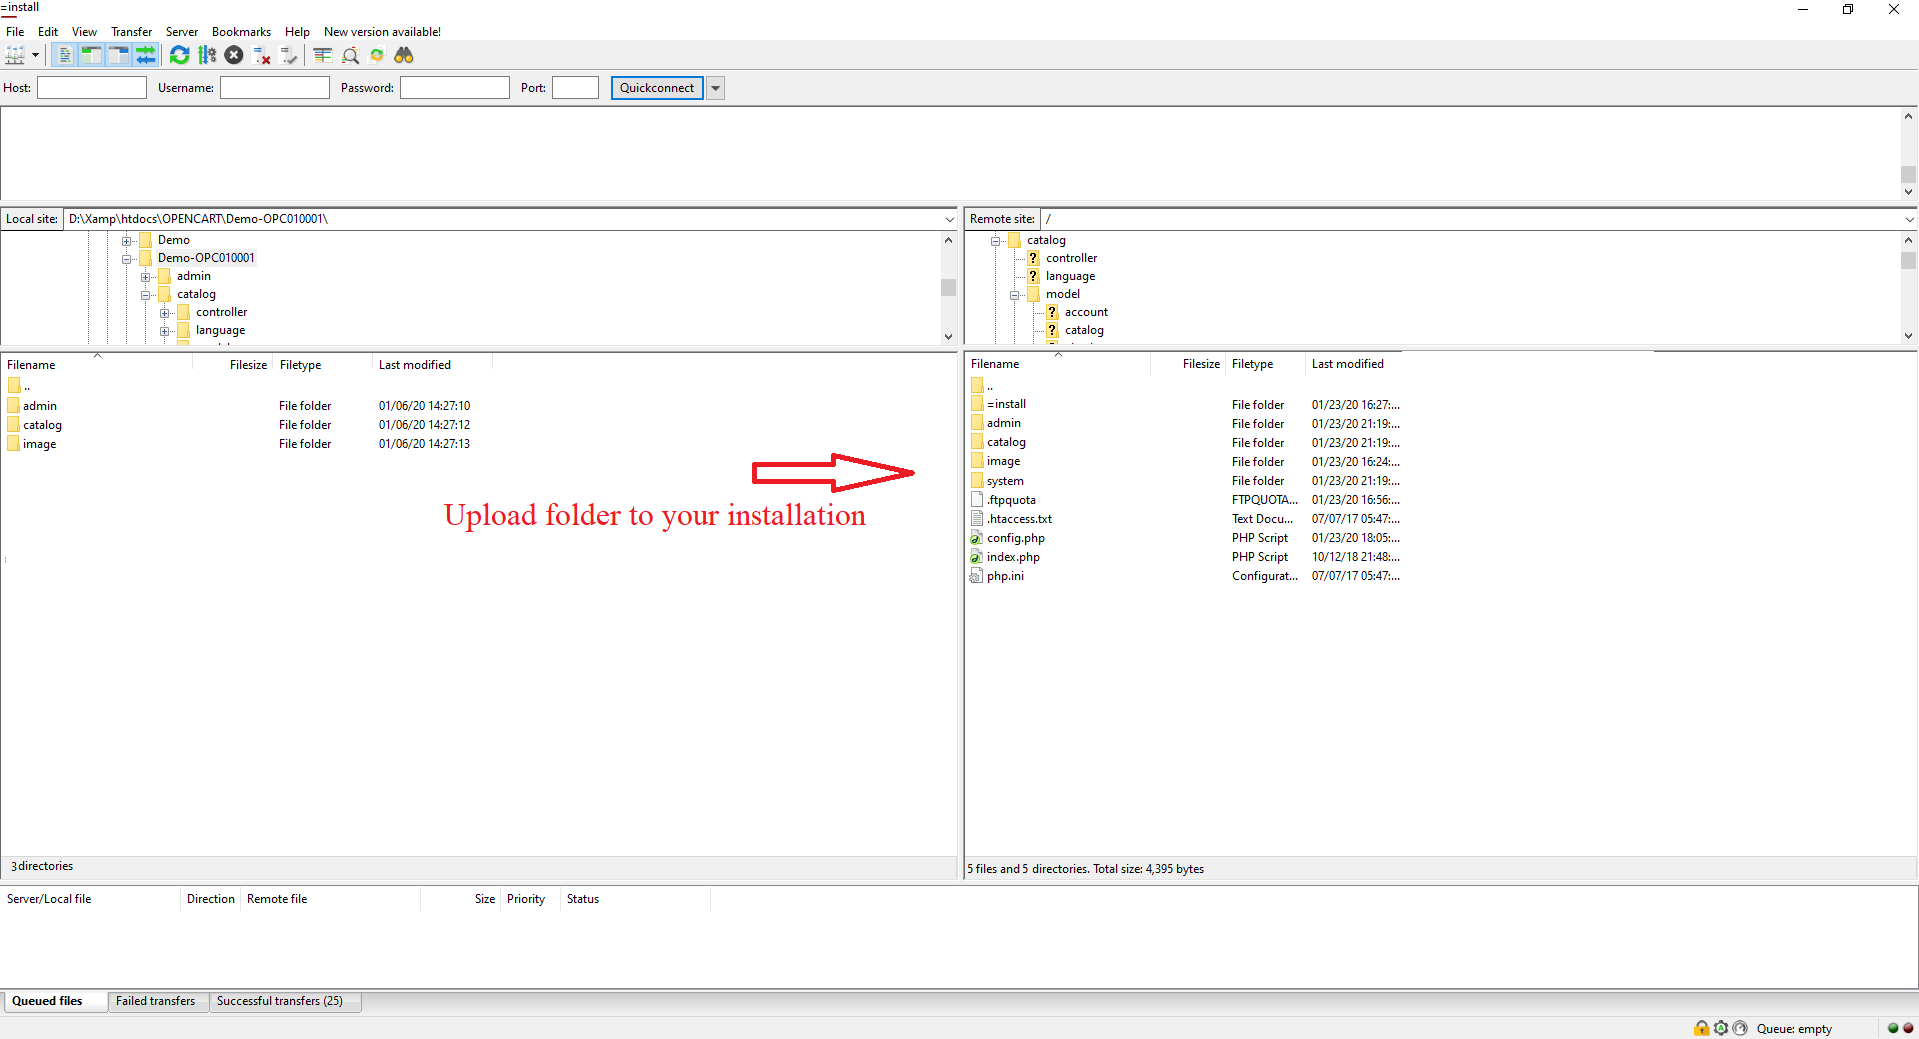
- Use an FTP client such as FileZilla, FireFTP or Cyberduck (if you are a Mac user) to connect to your hosting account.
- Browse to required directory (Normally public_html)
- Upload the files inside '/Fixfellow' folder.
Copy the directories from (provided in to ZIP file) to your opencart root respectively,
- ”admin” , ”catalog” , ”image” (Overwrite this folder)
e.g Your copy path will be
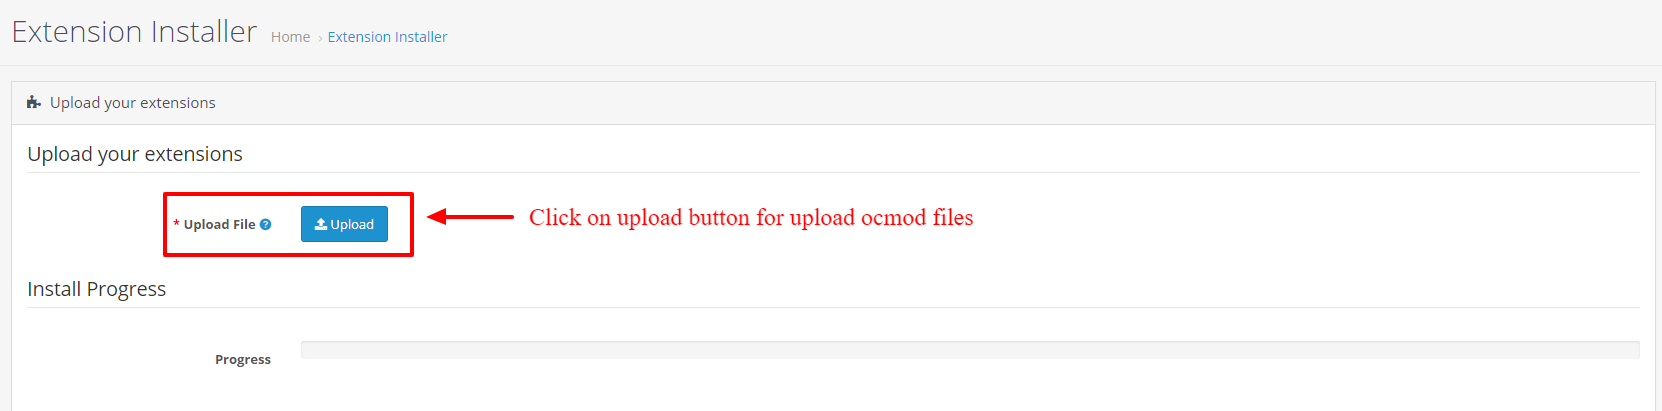
- upload ocmod file, go to Extensions > Installer
- Click on Upload button and select the file 'fixfellow.ocmod.zip' and 'SearchWithCategories.ocmod.zip' from package folder.
-
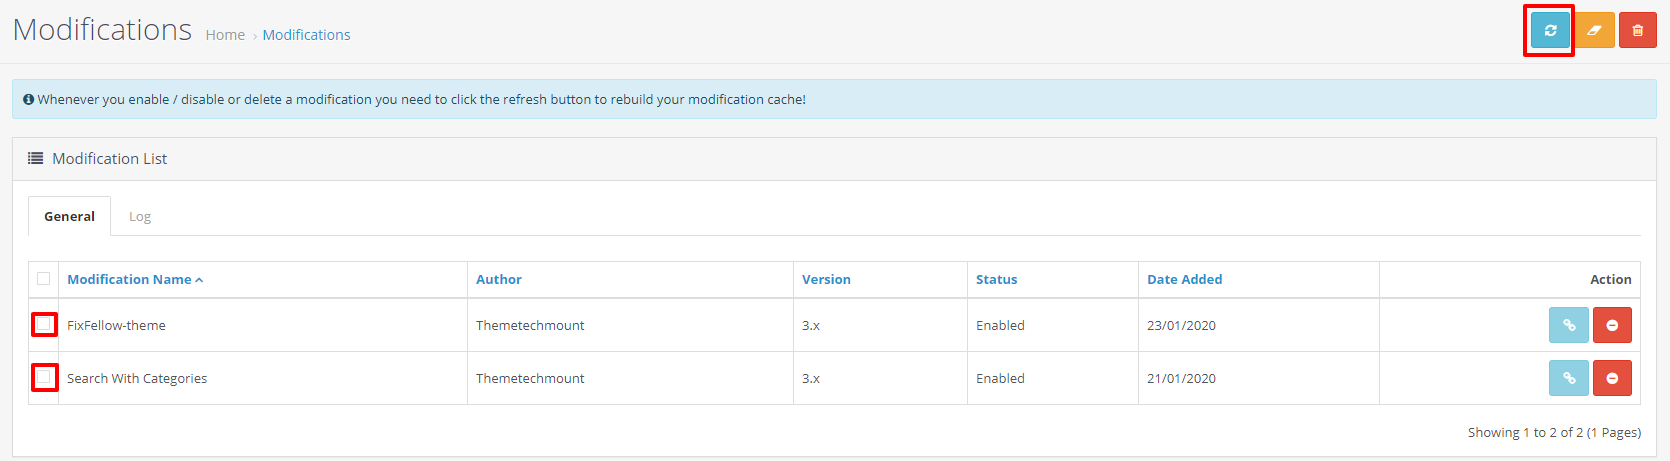
- Then , Go to Extensions > Modifications and click on Refresh button at the top right corner.
-
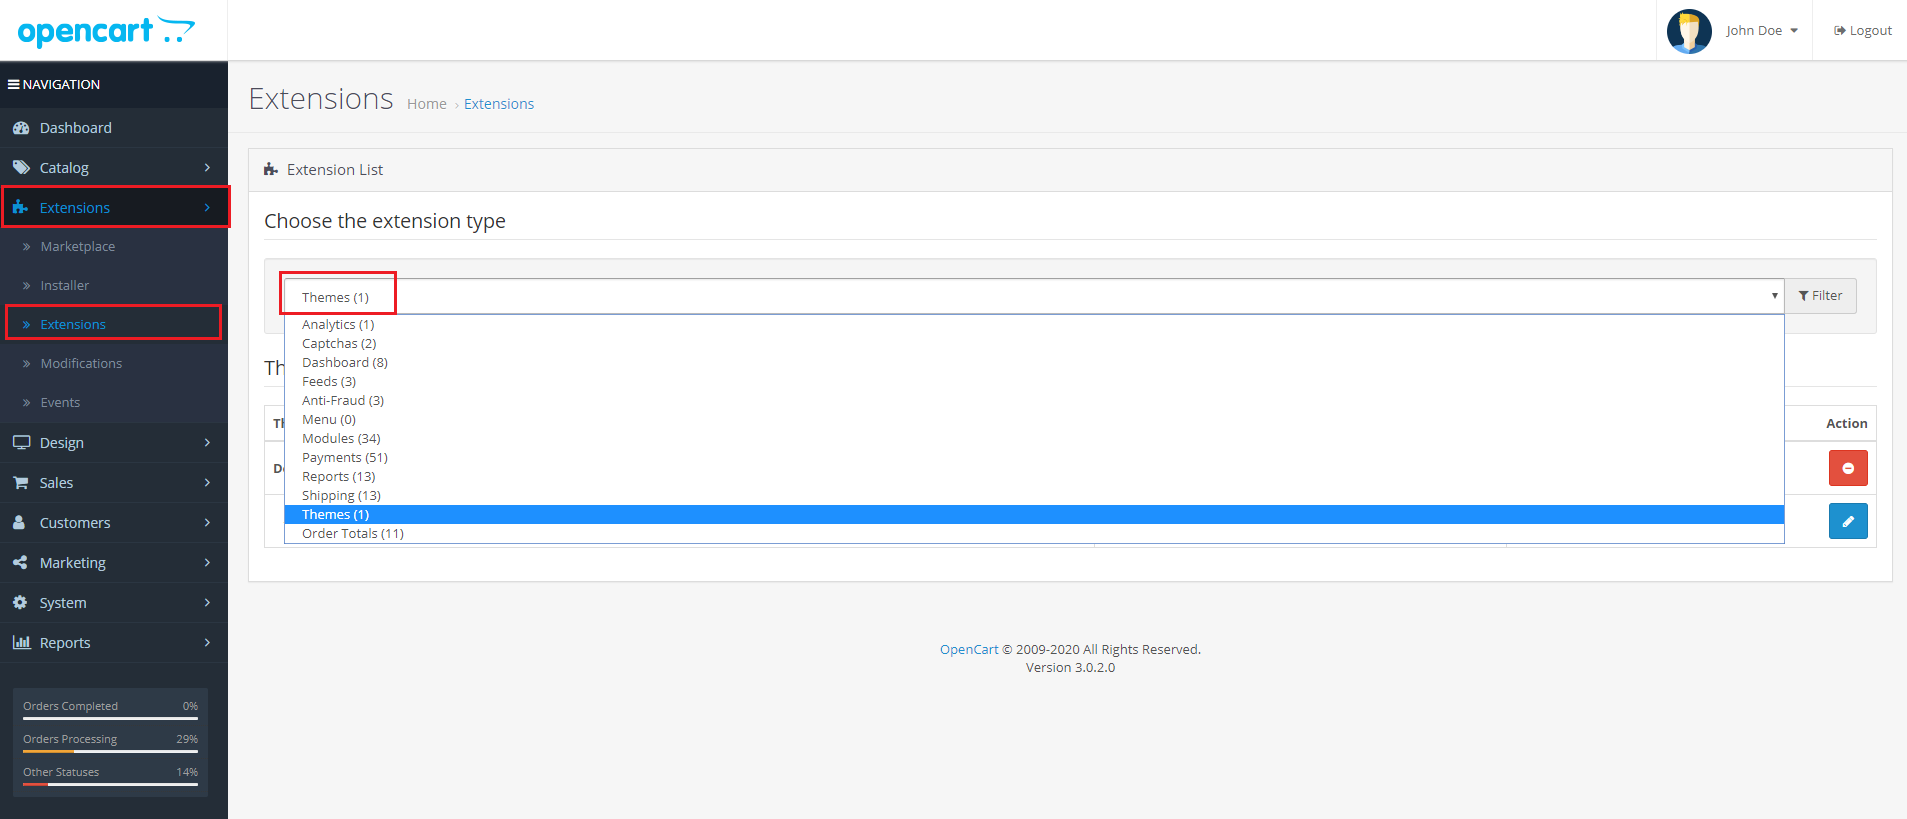
- Go to Admin Panel Extensions > Extensions
- Now select 'Themes' from dropdown. Click on Edit button of Your Store.
-
- Select 'fixfellow' into Theme Directory field dropdown,
- Status : Enabled
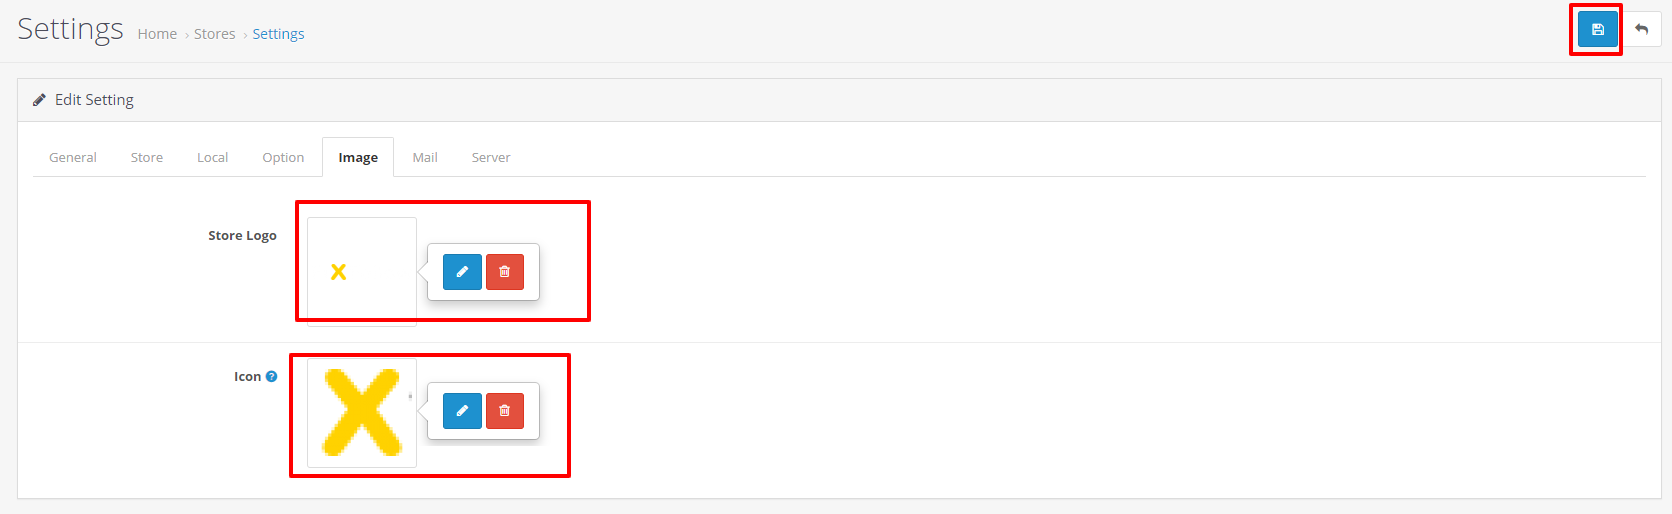
Step 2 : Logo setting
- For logo setting, Go to System > Setting > Edit > Images
- From Store Logo : upload your logo image
- Icon : upload favicon of your store.
- And Click on “Save” button at top right corner.
-
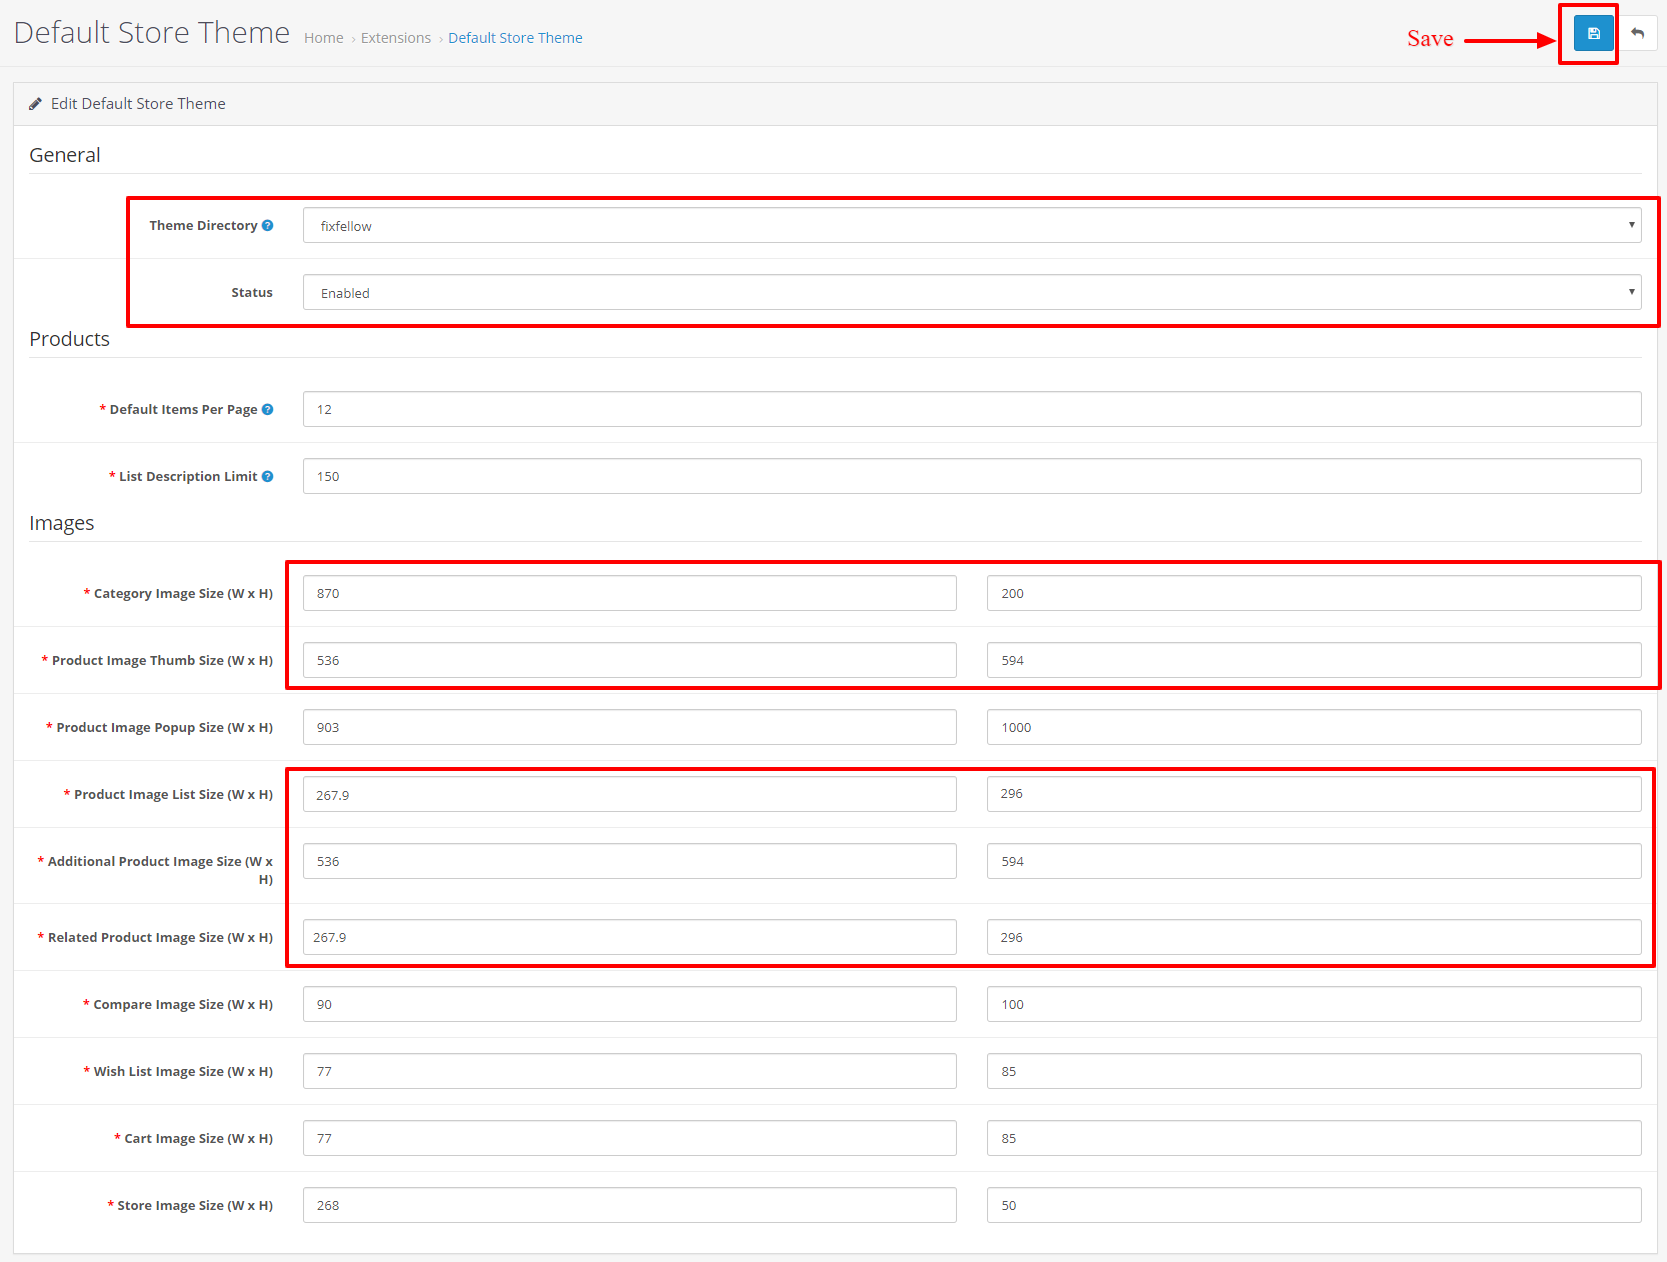
Step 3 : Image size setting
- Now we have to set our template from Admin panel
- Go to Admin Panel Extensions > Extensions
- Now select 'Themes' from dropdown. Click on Edit button of Your Store.
- Edit Default Store Theme > Images
- Change Image Size as shown in below And Click on “Save” button at top right corner.
-
Step 4 : Language setting
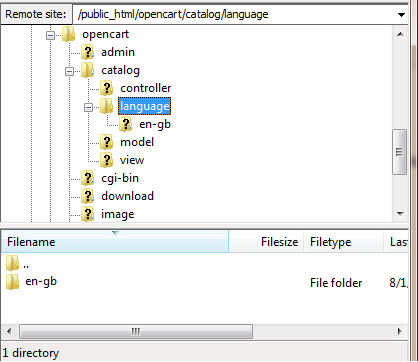
- For language setting ,
- Using an FTP , Before we continue, please make sure that you have downloaded your language pack from the Extension Directory and uncompressed the download contents to a location on your computer. Connect to your OpenCart store in the FTPLocate the root directory of where the OpenCart store was installed From there, open the path Catalog > Language , If this is your first time here, you will see an "en-gb" folder already in this location. In Catalog > Language, upload your new language pack to this location.
-
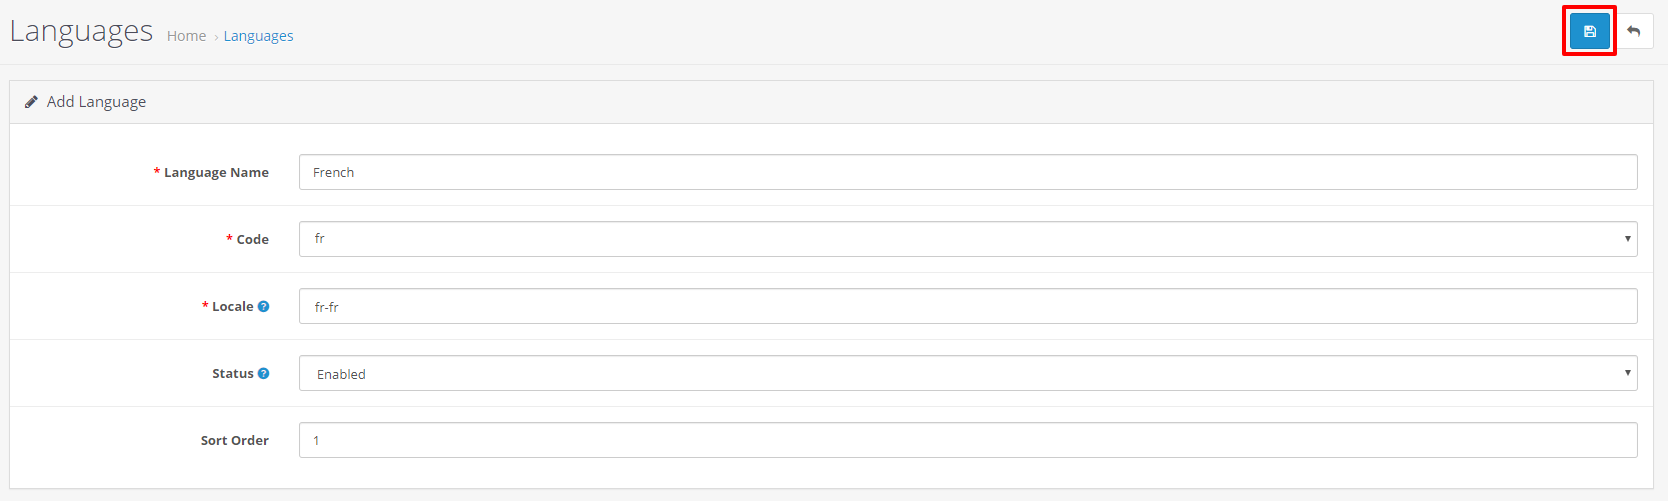
- Now ,in Admin panelGo to System > Localisation > Languages Click on “Add New” button at top right corner to add new Language.
- Language Name : French Code : fr Locale : fr-fr Status : Enabled Sort Order : as you like
- And Click on “Save” button at top right corner.
-
Step 5 : Banner setting
-
For Main banners ,
Go to Design > Banners.
Click on "Add New" button to add new banner. -
Banner Name : Home Page Slider
Status : Enabled
and click on "Add Banner" button.
Give title and link of your banner and click on image to upload your banner.
Again click on "Add Banner" button and upload another banners.
Now click on "Save" button at top right corner.
-

- For Activate your Main Banners,
Go to Extensions > Extensions , Select Modules from Dropdown.
Now select Slideshow and install it, then click on Edit -
Module name : Home Slideshow,
Banner : Home Page Slider,
Give Width and Height : (1920 X 649),
Status : Enabled,
Now click on "Save" button at top right corner.
-

-
For Carousel banner ,
Go to Design > Banners.
Click on "Add New" button to add new banner. -
Banner Name : Manufacturers
Status : Enabled
and click on "Add Banner" button.
Give title and link of your banner and click on image to upload your banner.
Now click on "Save" button at top right corner.
-

- For Activate your Carousel Banners,
Go to Extensions > Extensions , Select Modules from Dropdown.
Now select Banner, then click on Edit -
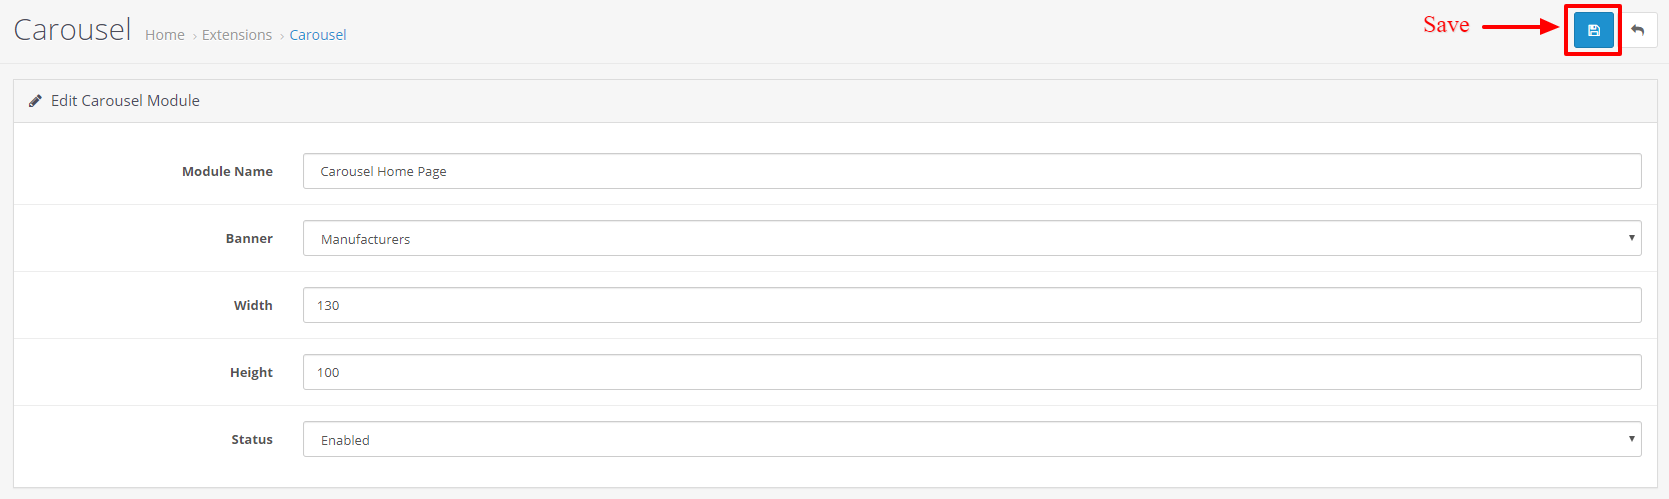
Module name : Carousel Home Page ,
Banner : Select Manufacturers from Dropdown.
Give Width and Height : (130 X 100),
Status : Enabled,
Now click on "Save" button at top right corner.
-
-
For Left banner ,
Go to Design > Banners.
Click on "Add New" button to add new banner. -
Banner Name : LeftBanner
Status : Enabled
and click on "Add Banner" button.
Give title and link of your banner and click on image to upload your banner.
Now click on "Save" button at top right corner.
-

- For Activate your left Banners,
Go to Extensions > Extensions , Select Modules from Dropdown.
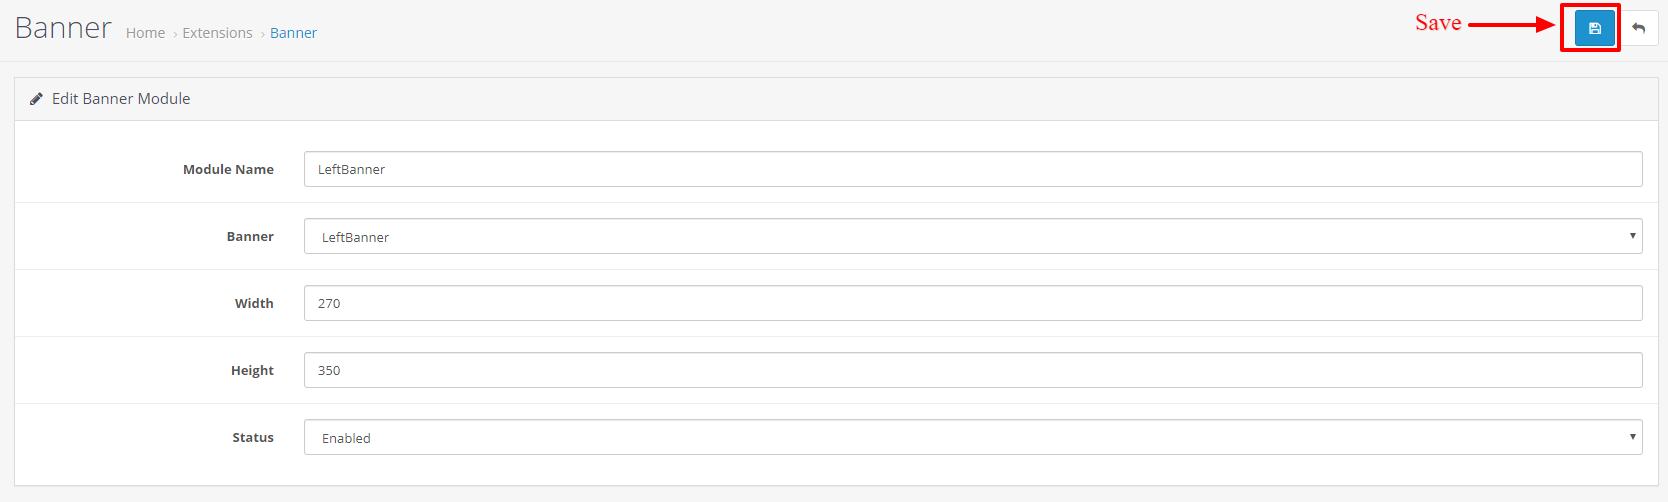
Now select Banner, then click on Edit -
Module name : LeftBanner ,
Banner : Select LeftBanner from Dropdown.
Give Width and Height : (270 X 350),
Status : Enabled,
Now click on "Save" button at top right corner.
-
Step 6 : Bestseller Products
-
For Bestseller Products ,
Go to Extensions > Extensions , Select Modules from Dropdown.
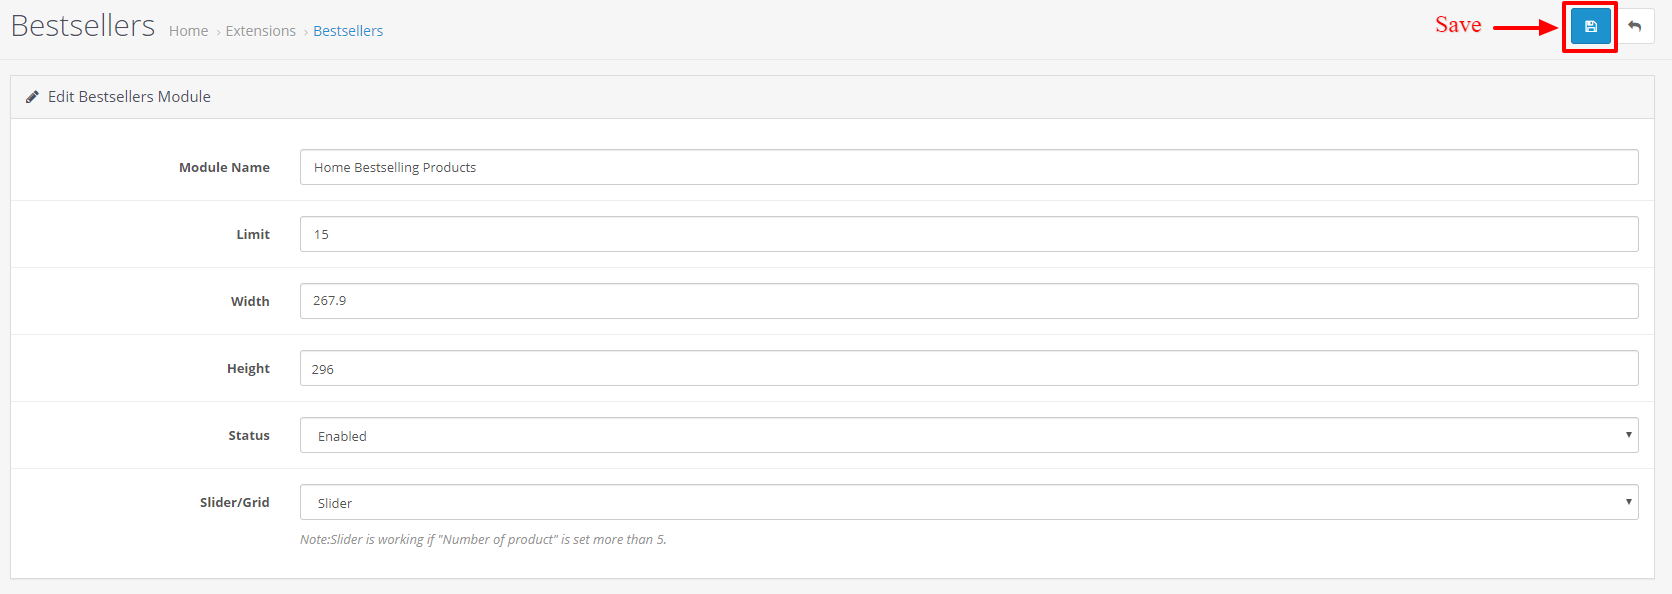
Now select Bestsellers and install it, then click on Edit -
Module Name : Home Bestselling Products ,
Limit : 15 ,
Give Width and Height : (267.9 X 296),
Status : Enabled,
Slider/Grid : as you like.
Now click on "Save" button at top right corner.
-
Step 6.2 : Side Bestseller Products
-
For Side Bestseller Products ,
Go to Extensions > Extensions , Select Modules from Dropdown.
Now select Side Bestsellers and install it, then click on Edit -
Module Name : Side Bestselling Products ,
Limit : 9 ,
Give Width and Height : (77 X 85),
Status : Enabled,
Slider/Grid : as you like.
Now click on "Save" button at top right corner.
-

Step 7 : Featured Products
-
For Featured Products ,
Go to Extensions > Extensions , Select Modules from Dropdown.
Now select Featured and install it, then click on Edit -
Module Name : Home Feature Products ,
Products : as you like ,
Limit : 15 ,
Give Width and Height : (267.9 X 296),
Status : Enabled,
Slider/Grid : as you like.
Now click on "Save" button at top right corner.
-

Step 7.2 : Side Featured Products
-
For Side Featured Products ,
Go to Extensions > Extensions , Select Modules from Dropdown.
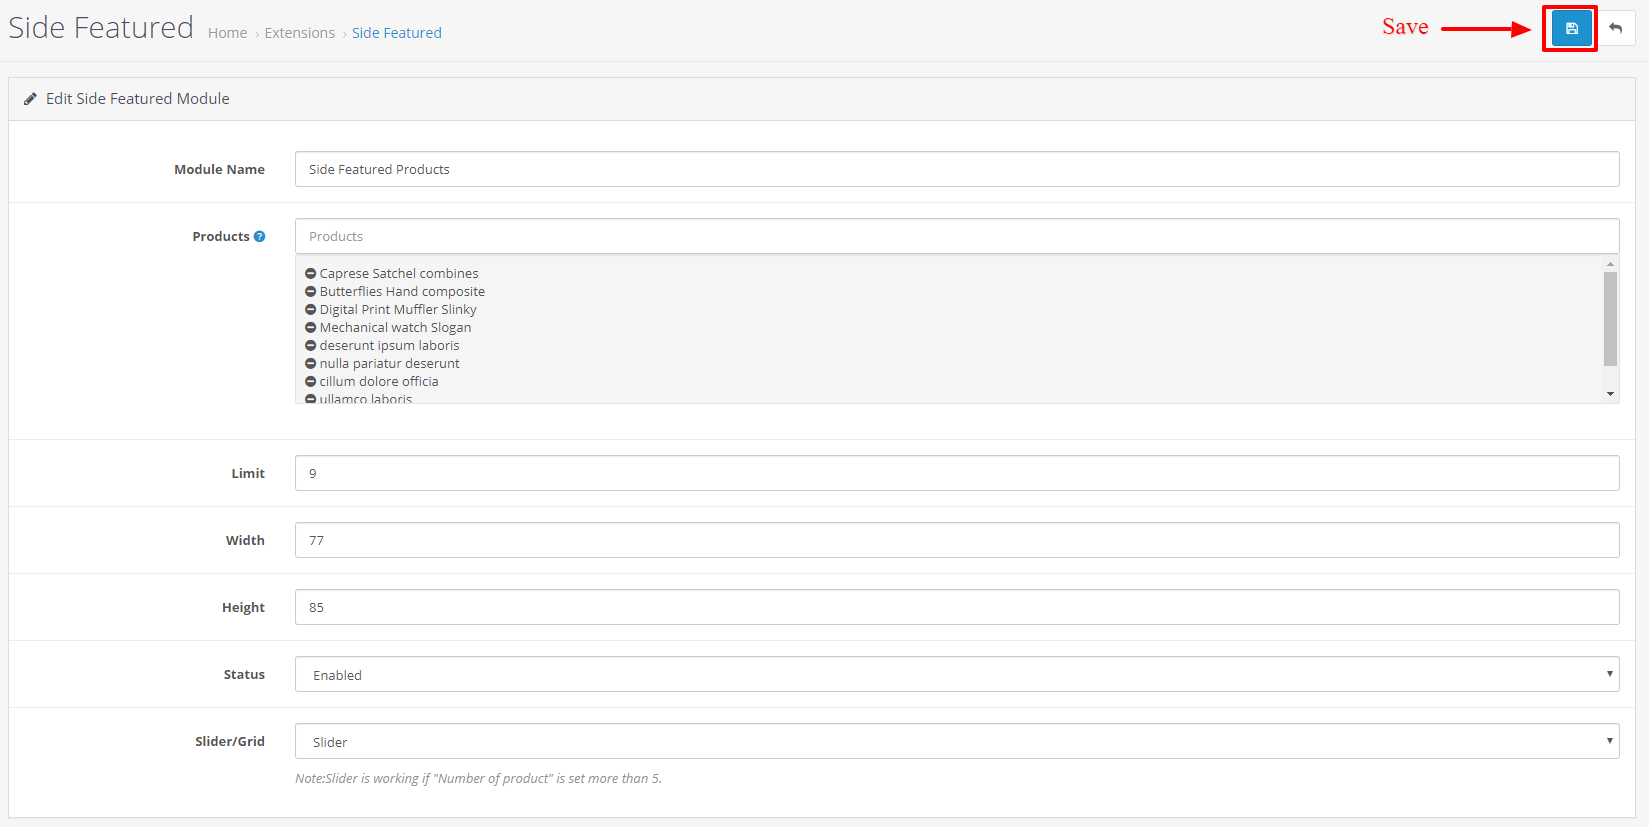
Now select Side Featured and install it, then click on Edit -
Module Name : Side Featured Products ,
Products : as you like ,
Limit : 9 ,
Give Width and Height : (77 X 85),
Status : Enabled,
Slider/Grid : as you like.
Now click on "Save" button at top right corner.
-
Step 8 : Latest Products
-
For Latest Products ,
Go to Extensions > Extensions , Select Modules from Dropdown.
Now select Latest and install it, then click on Edit -
Module Name : Home Latest Products ,
Limit : 15 ,
Give Width and Height : (267.9 X 296),
Status : Enabled,
Slider/Grid : as you like.
Now click on "Save" button at top right corner.
-

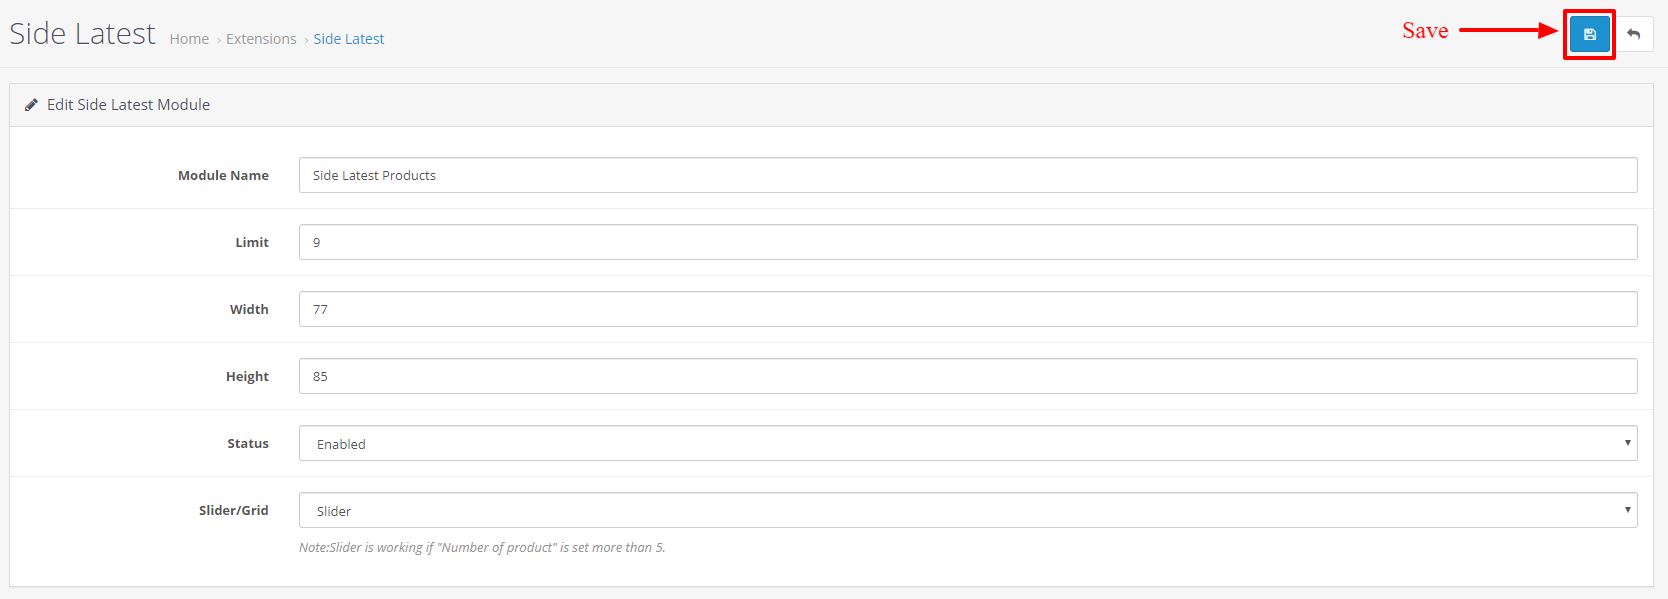
Step 8.2 : Side Latest Products
-
For Side Latest Products ,
Go to Extensions > Extensions , Select Modules from Dropdown.
Now select Side Latest and install it, then click on Edit -
Module Name : Side Latest Products ,
Limit : 9 ,
Give Width and Height : (77 X 85),
Status : Enabled,
Slider/Grid : as you like.
Now click on "Save" button at top right corner.
-
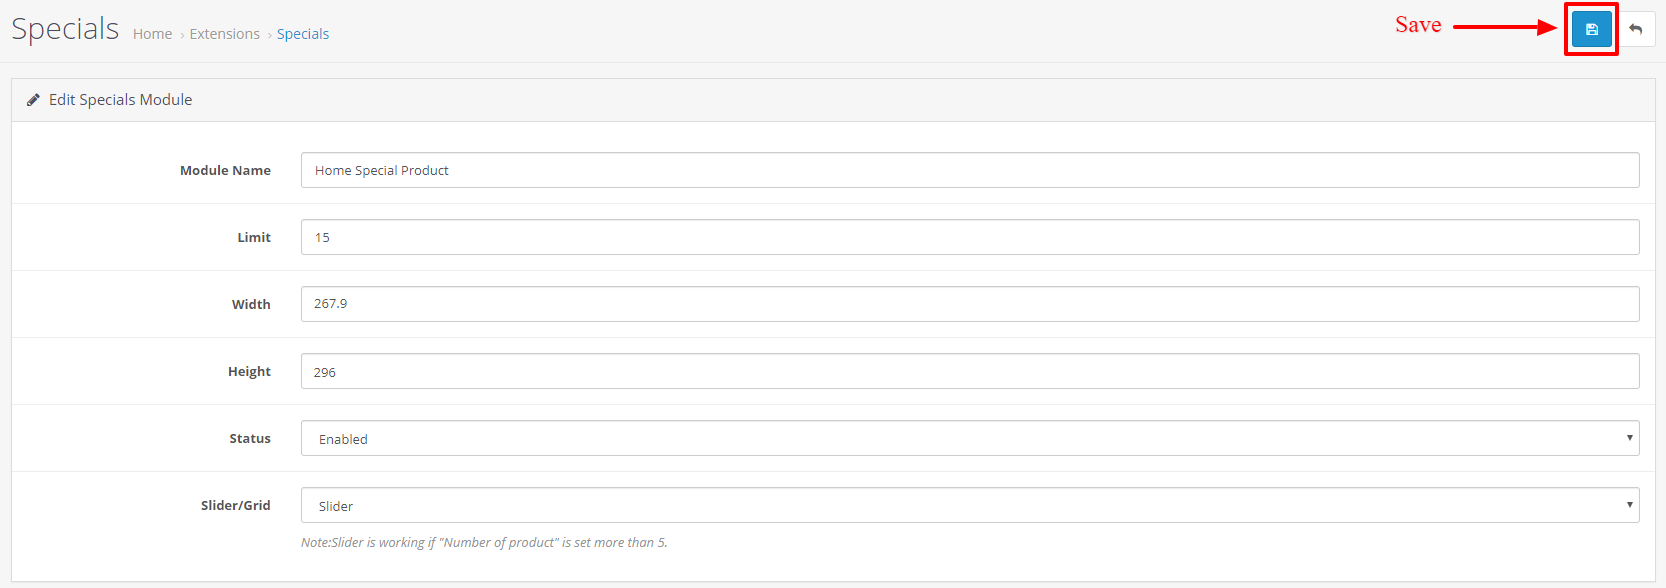
Step 9 : Special Products
-
For Special Products ,
Go to Extensions > Extensions , Select Modules from Dropdown.
Now select Specials and install it, then click on Edit -
Module Name : Home Special Product ,
Limit : 15 ,
Give Width and Height : (267.9 X 296),
Status : Enabled,
Slider/Grid : as you like.
Now click on "Save" button at top right corner.
-
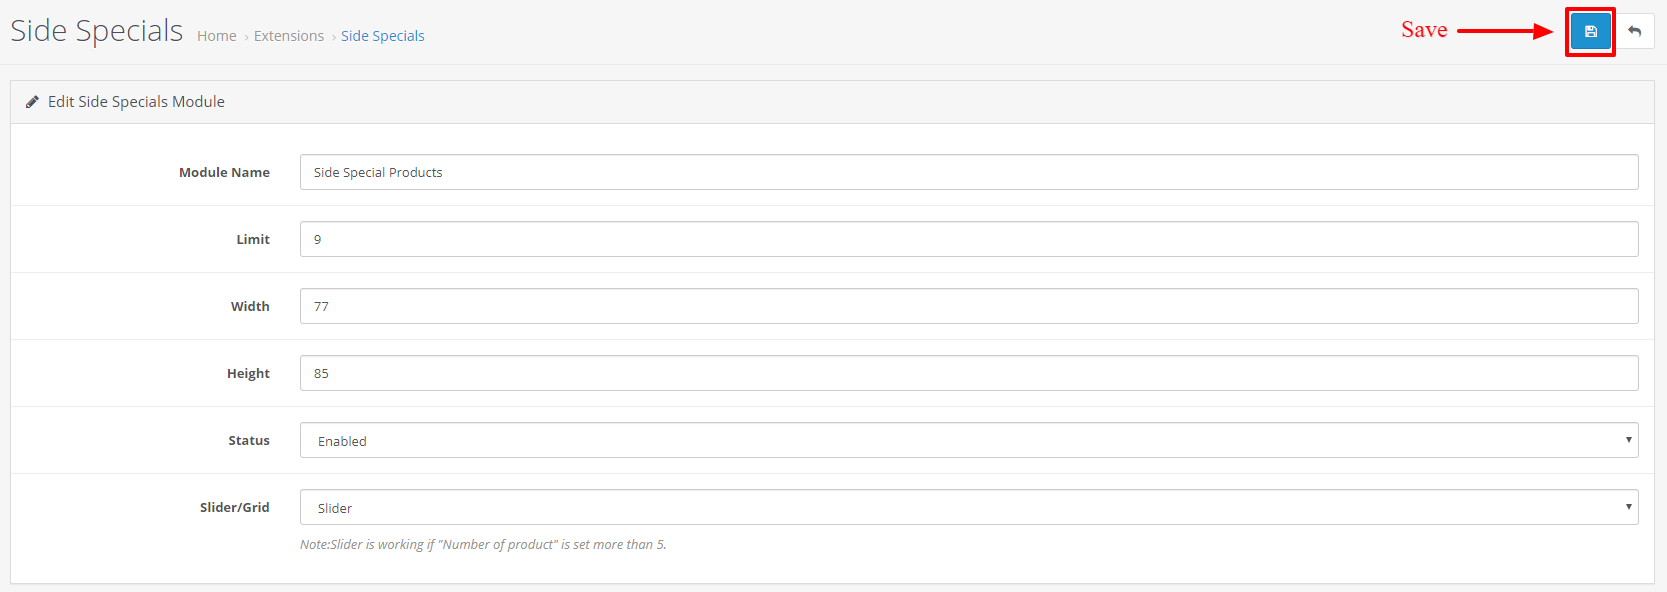
Step 9.2 : Side Special Products
-
For Side Special Products ,
Go to Extensions > Extensions , Select Modules from Dropdown.
Now select Side Specials and install it, then click on Edit -
Module Name : Side Special Products ,
Limit : 9 ,
Give Width and Height : (77 X 85),
Status : Enabled,
Slider/Grid : as you like.
Now click on "Save" button at top right corner.
-
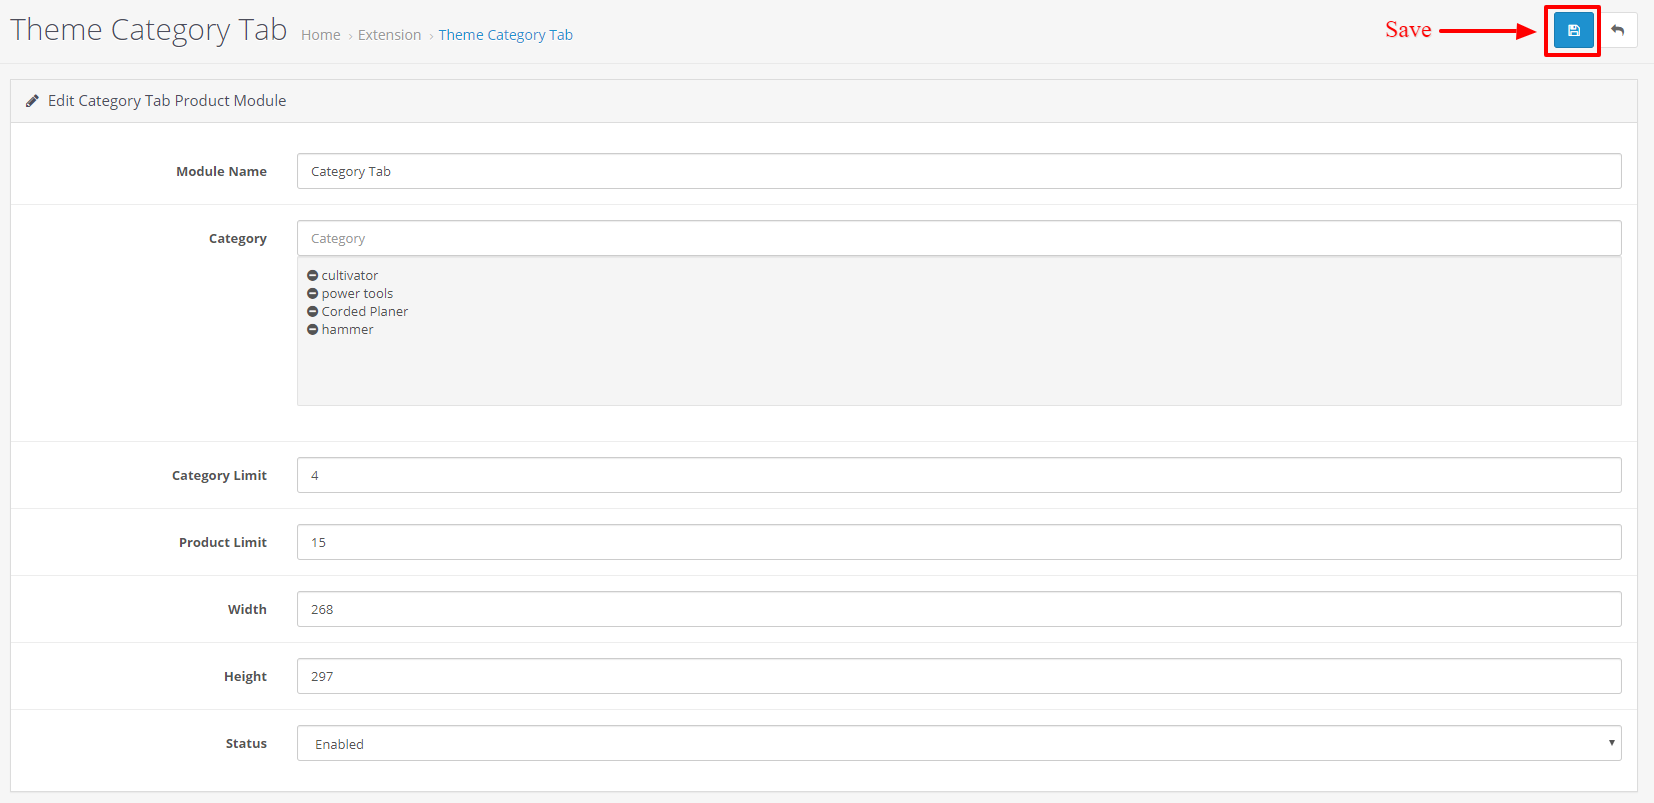
Step 10 : Theme Category Tab
-
For Category Tab ,
Go to Extensions > Extensions , Select Modules from Dropdown.
Now select Theme Category Tab and install it, then click on Edit -
Module Name : Category Tab ,
Category : as you like ,
Category Limit : 4 ,
Product Limit : 15 ,
Give Width and Height : (267.9 X 296),
Status : Enabled,
Now click on "Save" button at top right corner.
-
Step 11 : HTML Content
-
For HTML Content ,
Go to Extensions > Extensions , Select Modules from Dropdown.
Now select HTML Content and install it, then click on Edit -
For Top Bar Block ,
Click on "Add New" to add cms block.
Module Name : Top Bar Block
Now click on Code View button in text editor block ,copy and paste this code, After this again click on Code View button to save your HTML content.
status : Enabled

Click here & Copy this code
<div class="top_bar_contact_item">Winter-Season Sale Up To
<span class="ttm-textcolor-highlight"> 25% </span>
OFF Use Coupon Code
<span class="coupen_code ttm-textcolor-highlight">“SALEON”</span>
</div>
-
For Header Bottom Block ,
Click on "Add New" to add cms block.
Module Name : Header Bottom Block
Now click on Code View button in text editor block ,copy and paste this code, After this again click on Code View button to save your HTML content.
status : Enabled
Click here & Copy this code
<div class="user_zone_block">
<a href="?route=account/register" class="user_zone_block_inner">
<div class="icon"><i class="fa fa-gift"></i></div>
<div class="text">New User Zone</div>
</a>
</div>
-
For Service Block ,
Click on "Add New" to add cms block.
Module Name : Service Block
Now click on Code View button in text editor block ,copy and paste this code, After this again click on Code View button to save your HTML content.
status : Enabled
Click here & Copy this code
<div id="ttm_serviceblock">
<div class="container">
<div class="service_inner_content">
<ul>
<li class="service_content service1 col-lg-4 col-md-4 col-sm-4 col-xs-12">
<div class="service_content_inner">
<div class="service_image_block"><span class="service_icon"> </span></div>
<div class="service-des">
<span class="service-title">Fast and Free Shipping</span>
<span class="service-desc">Sed rutrum ipsum nunc, at ultrices Loream libero consectetur.</span>
</div>
</div>
</li>
<li class="service_content service2 col-lg-4 col-md-4 col-sm-4 col-xs-12">
<div class="service_content_inner">
<div class="service_image_block"><span class="service_icon"> </span></div>
<div class="service-des">
<span class="service-title">100% Money Back</span>
<span class="service-desc">Sed rutrum ipsum nunc, at ultrices Loream libero consectetur.</span>
</div>
</div>
</li>
<li class="service_content service3 col-lg-4 col-md-4 col-sm-4 col-xs-12">
<div class="service_content_inner">
<div class="service_image_block"><span class="service_icon"> </span></div>
<div class="service-des">
<span class="service-title">Support 24/7 Days</span>
<span class="service-desc">Sed rutrum ipsum nunc, at ultrices Loream libero consectetur.</span>
</div>
</div>
</li>
</ul>
</div>
</div>
</div>
-
For Sub banner Block ,
Click on "Add New" to add cms block.
Module Name : Sub banner Block
Now click on Code View button in text editor block ,copy and paste this code, After this again click on Code View button to save your HTML content.
status : Enabled
Click here & Copy this code
<div id="ttm_subbanner">
<div class="container">
<div class="row subbanner">
<ul class="subbanner-wrapper col-lg-8 col-md-6">
<div class="subbanner_content_wrapper row">
<li class="subbanner_content col-lg-6 col-md-6 col-sm-6">
<div class="subbanner_item">
<a href="#" class="img"><img src="image/catalog/banners/subbanner_img1.jpg" alt=""></a>
</div>
</li>
<li class="subbanner_content col-lg-6 col-md-6 col-sm-6">
<div class="subbanner_item">
<a href="#" class="img"><img src="image/catalog/banners/subbanner_img2.jpg" alt=""></a>
</div>
</li>
</div>
<li class="subbanner_content thirdbanner">
<div class="subbanner_item">
<a href="#" class="img"><img src="image/catalog/banners/subbanner_img3.jpg" alt=""></a>
</div>
</li>
</ul>
<ul class="subbanner-wrapper1 col-lg-4 col-md-6">
<li class="subbanner_content">
<div class="subbanner_item">
<a href="#" class="img"><img src="image/catalog/banners/subbanner_img4.jpg" alt=""></a>
</div>
</li>
</ul>
</div>
</div>
</div>
-
For Testimonial Block ,
Click on "Add New" to add cms block.
Module Name : Testimonial Block
Now click on Code View button in text editor block ,copy and paste this code, After this again click on Code View button to save your HTML content.
status : Enabled
Click here & Copy this code
<div id="ttmtestimonialcmsblock" class="testimonial-block">
<div class="testimonial-block-wrapper"></div>
<div class="container">
<div class="heading-title">
<div class="main-heading-text">testimonials</div>
<div class="main-heading">What Our Customers Saying</div>
</div>
<ul id="ttmtestimonial_carousel">
<li class="testimonial-content">
<div class="testimonial-content-inner">
<div class="testimonial-avatar">
<div class="testimonial-img"><img src="image/catalog/banners/avtar1.jpg" alt=""></div>
</div>
<div class="testimonial-desc">
Lorem Ipsum is simply dummy text of tled it te spec. It has survived not only five centuries
</div>
<div class="testimonial-caption">
<div class="name">Alex Ritchell</div>
<div class="designation">CEO At Founder</div>
<div class="star-ratings">
<ul class="rating">
<li><i class="fa fa-star"></i></li>
<li><i class="fa fa-star"></i></li>
<li><i class="fa fa-star"></i></li>
<li><i class="fa fa-star"></i></li>
<li><i class="fa fa-star"></i></li>
</ul>
</div>
</div>
</div>
</li>
<li class="testimonial-content">
<div class="testimonial-content-inner">
<div class="testimonial-avatar">
<div class="testimonial-img"><img src="image/catalog/banners/avtar2.jpg" alt=""></div>
</div>
<div class="testimonial-desc">
Lorem Ipsum is simply dummy text of tled it te spec. It has survived not only five centuries
</div>
<div class="testimonial-caption">
<div class="name">Leaax May</div>
<div class="designation">CEO At Founder</div>
<div class="star-ratings">
<ul class="rating">
<li><i class="fa fa-star"></i></li>
<li><i class="fa fa-star"></i></li>
<li><i class="fa fa-star"></i></li>
<li><i class="fa fa-star-o"></i></li>
<li><i class="fa fa-star-o"></i></li>
</ul>
</div>
</div>
</div>
</li>
<li class="testimonial-content">
<div class="testimonial-content-inner">
<div class="testimonial-avatar">
<div class="testimonial-img"><img src="image/catalog/banners/avtar3.jpg" alt=""></div>
</div>
<div class="testimonial-desc">
Lorem Ipsum is simply dummy text of tled it te spec. It has survived not only five centuries
</div>
<div class="testimonial-caption">
<div class="name">Alan Sears</div>
<div class="designation">CEO At Founder</div>
<div class="star-ratings">
<ul class="rating">
<li><i class="fa fa-star"></i></li>
<li><i class="fa fa-star"></i></li>
<li><i class="fa fa-star-o"></i></li>
<li><i class="fa fa-star-o"></i></li>
<li><i class="fa fa-star-o"></i></li>
</ul>
</div>
</div>
</div>
</li>
<li class="testimonial-content">
<div class="testimonial-content-inner">
<div class="testimonial-avatar">
<div class="testimonial-img"><img src="image/catalog/banners/avtar4.jpg" alt=""></div>
</div>
<div class="testimonial-desc">
Lorem Ipsum is simply dummy text of tled it te spec. It has survived not only five centuries
</div>
<div class="testimonial-caption">
<div class="name">Ritchell Sears</div>
<div class="designation">CEO At Founder</div>
<div class="star-ratings">
<ul class="rating">
<li><i class="fa fa-star"></i></li>
<li><i class="fa fa-star"></i></li>
<li><i class="fa fa-star"></i></li>
<li><i class="fa fa-star"></i></li>
<li><i class="fa fa-star-o"></i></li>
</ul>
</div>
</div>
</div>
</li>
</ul>
</div>
</div>
-
For Offer Banner Block ,
Click on "Add New" to add cms block.
Module Name : Offer Banner Block
Now click on Code View button in text editor block ,copy and paste this code, After this again click on Code View button to save your HTML content.
status : Enabled
Click here & Copy this code
<div id="ttmofferblock">
<div class="container">
<div class="offerblock-text">
<a href="#" class="offerblock-text1">winter offer!</a>
<span class="offerblock-text2">BarloWorld <span>Equipment</span><br>Handyman Tools!</span>
</div>
</div>
</div>
-
For Footer Social Block ,
Click on "Add New" to add cms block.
Module Name : Footer Social Block
Now click on Code View button in text editor block ,copy and paste this code, After this again click on Code View button to save your HTML content.
status : Enabled
Click here & Copy this code
<div class="ttm-social-block col-lg-3 col-md-3 col-sm-12">
<div class="social">
<ul>
<li class="facebook"><a href="#">Facebook</a></li>
<li class="twitter"><a href="#">Twitter</a></li>
<li class="google-plus"><a href="#">Google-Plus</a></li>
<li class="rss"><a href="#">RSS</a></li>
</ul>
</div>
</div>
-
For Footer Contact Block ,
Click on "Add New" to add cms block.
Module Name : Footer Contact Block
Now click on Code View button in text editor block ,copy and paste this code, After this again click on Code View button to save your HTML content.
status : Enabled
Click here & Copy this code
<div id="ttmcontact" class="col-md-9 col-lg-10">
<h5>Store information</h5>
<ul id="foote_contact_list" class="row">
<li class="col-lg-4 col-md-4 col-sm-4 col-xs-4">
<div class="icon"><i class="fa fa-map-marker"></i></div>
<div class="data">
<span class="contact_title">Our Main Branch</span>
<span class="contact_desc">NewYork City,United States</span>
</div>
</li>
<li class="col-lg-4 col-md-4 col-sm-4 col-xs-4">
<div class="icon"><i class="fa fa-envelope-o"></i></div>
<div class="data">
<span class="contact_title">email us</span>
<span class="contact_desc">info@example.com</span>
</div>
</li>
<li class="col-lg-4 col-md-4 col-sm-4 col-xs-4">
<div class="icon"><i class="fa fa-phone"></i></div>
<div class="data">
<span class="contact_title">call us</span>
<span class="contact_desc">+123-456-7890</span>
</div>
</li>
</ul>
</div>
-
For About us Block ,
Click on "Add New" to add cms block.
Module Name : About us Block
Now click on Code View button in text editor block ,copy and paste this code, After this again click on Code View button to save your HTML content.
status : Enabled
Click here & Copy this code
<div id="ttmblockaboutus">
<h5>aboutus</h5>
<ul class="blockaboutus-inner">
<div class="block-aboutus">
<span class="block-details">Lorem Ipsum is simp dummy text of the printing and Lorem Ipsum is simp dummy text of the printing and types etting industry. Lorem Ipsum hatypes.</span>
<a href="#" class="block-aboutus-btn">Read more <i class="fa fa-angle-double-right"></i></a>
</div>
</ul>
</div>
-
For Footer Payment CMS ,
Click on "Add New" to add cms block.
Module Name : Footer Payment CMS
Now click on Code View button in text editor block ,copy and paste this code, After this again click on Code View button to save your HTML content.
status : Enabled
Click here & Copy this code
<div id="ttmpaymentblock">
<div class="ttmpayment">
<ul class="payment-block-inner">
<li class="icon"><a href="#"><img src="image/catalog/banners/card-1.png" alt=""></a></li>
<li class="icon"><a href="#"><img src="image/catalog/banners/card-2.png" alt=""></a></li>
<li class="icon"><a href="#"><img src="image/catalog/banners/card-3.png" alt=""></a></li>
<li class="icon"><a href="#"><img src="image/catalog/banners/card-4.png" alt=""></a></li>
<li class="icon"><a href="#"><img src="image/catalog/banners/card-5.png" alt=""></a></li>
<li class="icon"><a href="#"><img src="image/catalog/banners/card-6.png" alt=""></a></li>
</ul>
</div>
</div>
Step 12 : Account
-
For Account ,
Go to Extensions > Extensions , Select Modules from Dropdown.
Now select Account and install it, then click on Edit
Status : Enabled,
Now click on "Save" button at top right corner.
Step 13 : Information
-
For Information ,
Go to Extensions > Extensions , Select Modules from Dropdown.
Now select Information and install it, then click on Edit
Status : Enabled,
Now click on "Save" button at top right corner.
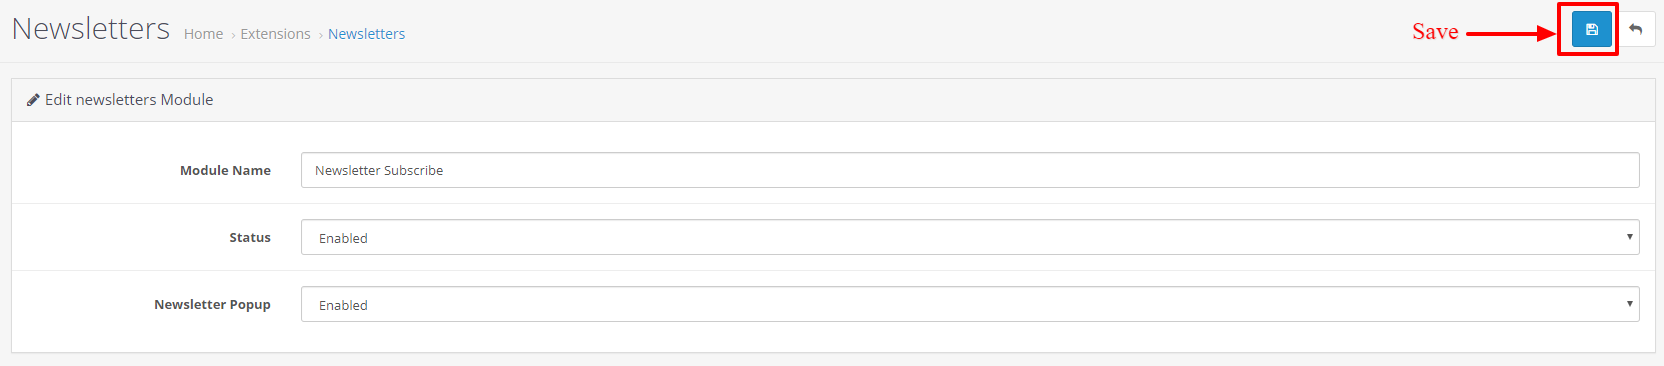
Step 14 : Newsletters
-
For Newsletters ,
Go to Extensions > Extensions , Select Modules from Dropdown.
Now select Newsletters and install it, then click on Edit
-
Module Name : Newsletter Subscribe ,
Status : Enabled,
Newsletter Popup : Enabled,
Now click on "Save" button at top right corner.
-
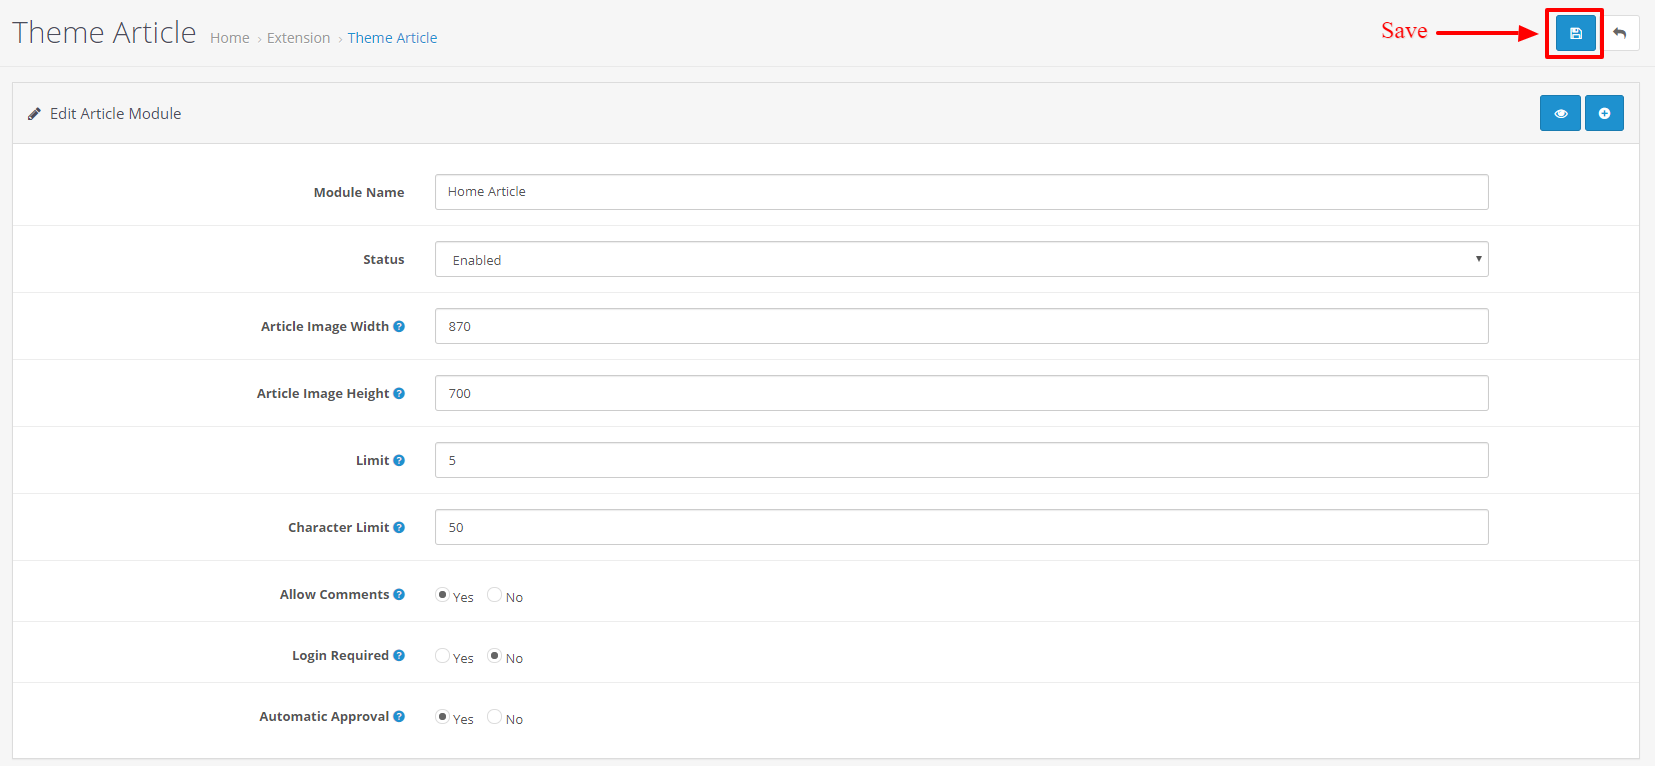
Step 15 : Theme Article
-
For Theme Article ,
Go to Extensions > Extensions , Select Modules from Dropdown.
Now select Theme Article and install it, then click on Edit
Status : Enabled,
Now click on "Save" button at top right corner.
-
Module Name : Home Article ,
Status : Enabled,
Articale Image Width : 870 ,
Articale Image Height : 700 ,
Limit : 6 ,
Character Limit : 50 ,
Allow Comments : Enabled,
Login Required : Disabled,
Automatic Approval : Enabled,
Now click on "Save" button at top right corner.
-
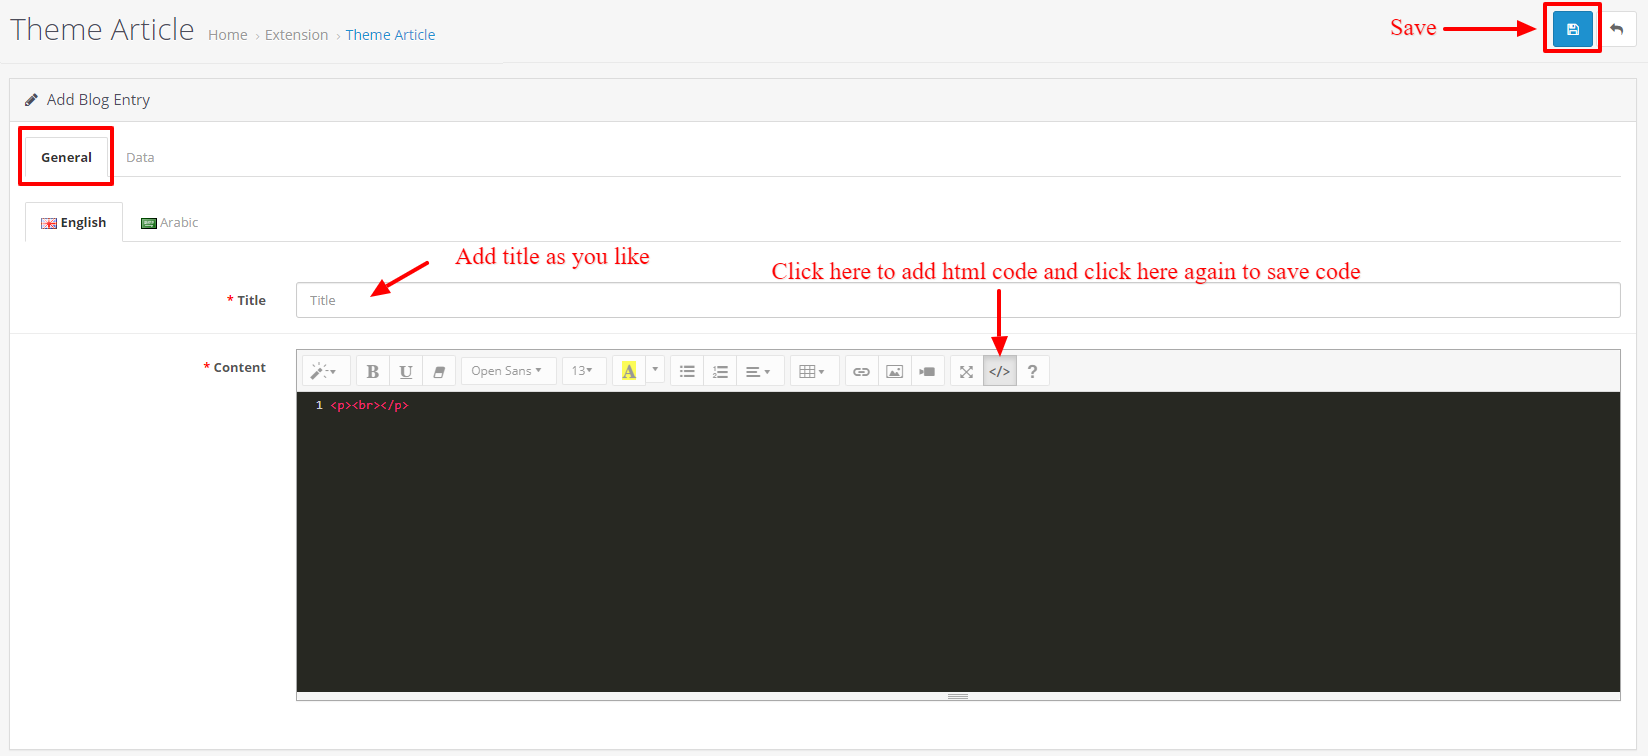
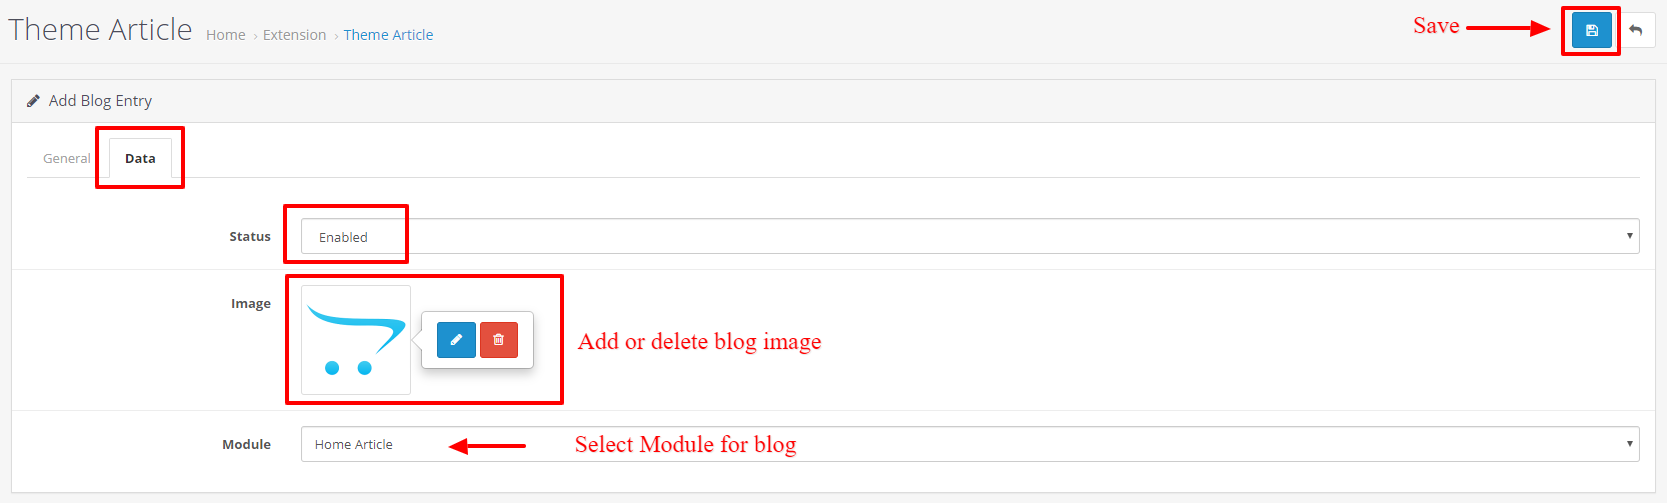
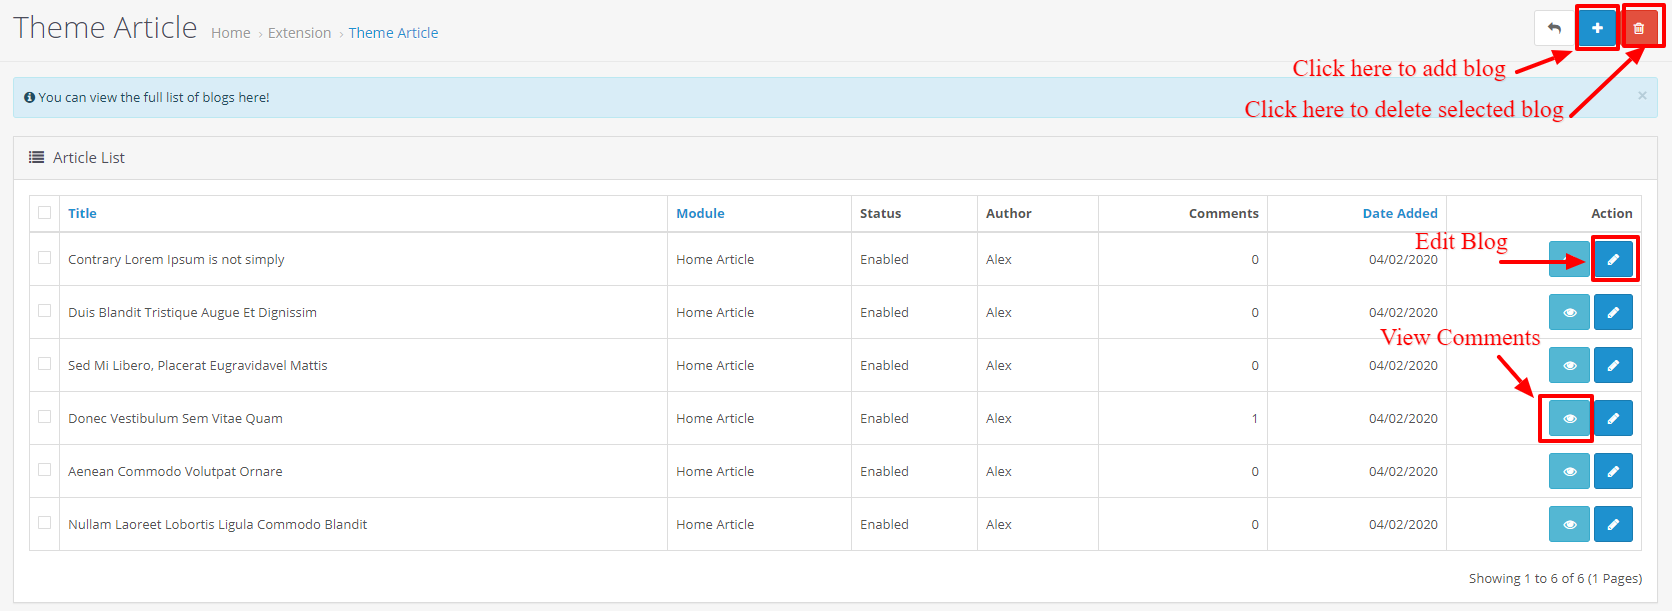
- Now Add Blog and Blog list ,

Now Go to "General" Tab,
Title : as you like,
Content : as you like
Go to "Data" Tab,
Status : Enabled,
Image : add or remove image for blog,
Module : Home Article
Now click on "Save" button at top right corner.
- For Delete Blog, Edit Blog , View Comment
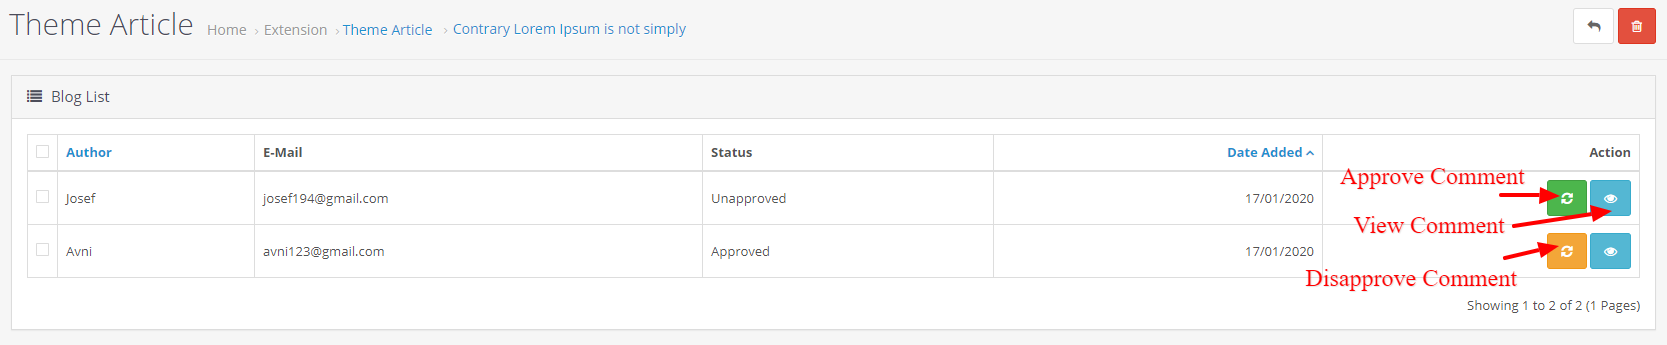
-
For Approve Comment , Disapprove Comment
Step 16 : Vertical Category
-
For Vertical Category ,
Go to Extensions > Extensions , Select Modules from Dropdown.
Now select Theme Vertical Category and install it, then click on Edit
Status : Enabled,
Now click on "Save" button at top right corner.
Step 17 : Layout Setting
-
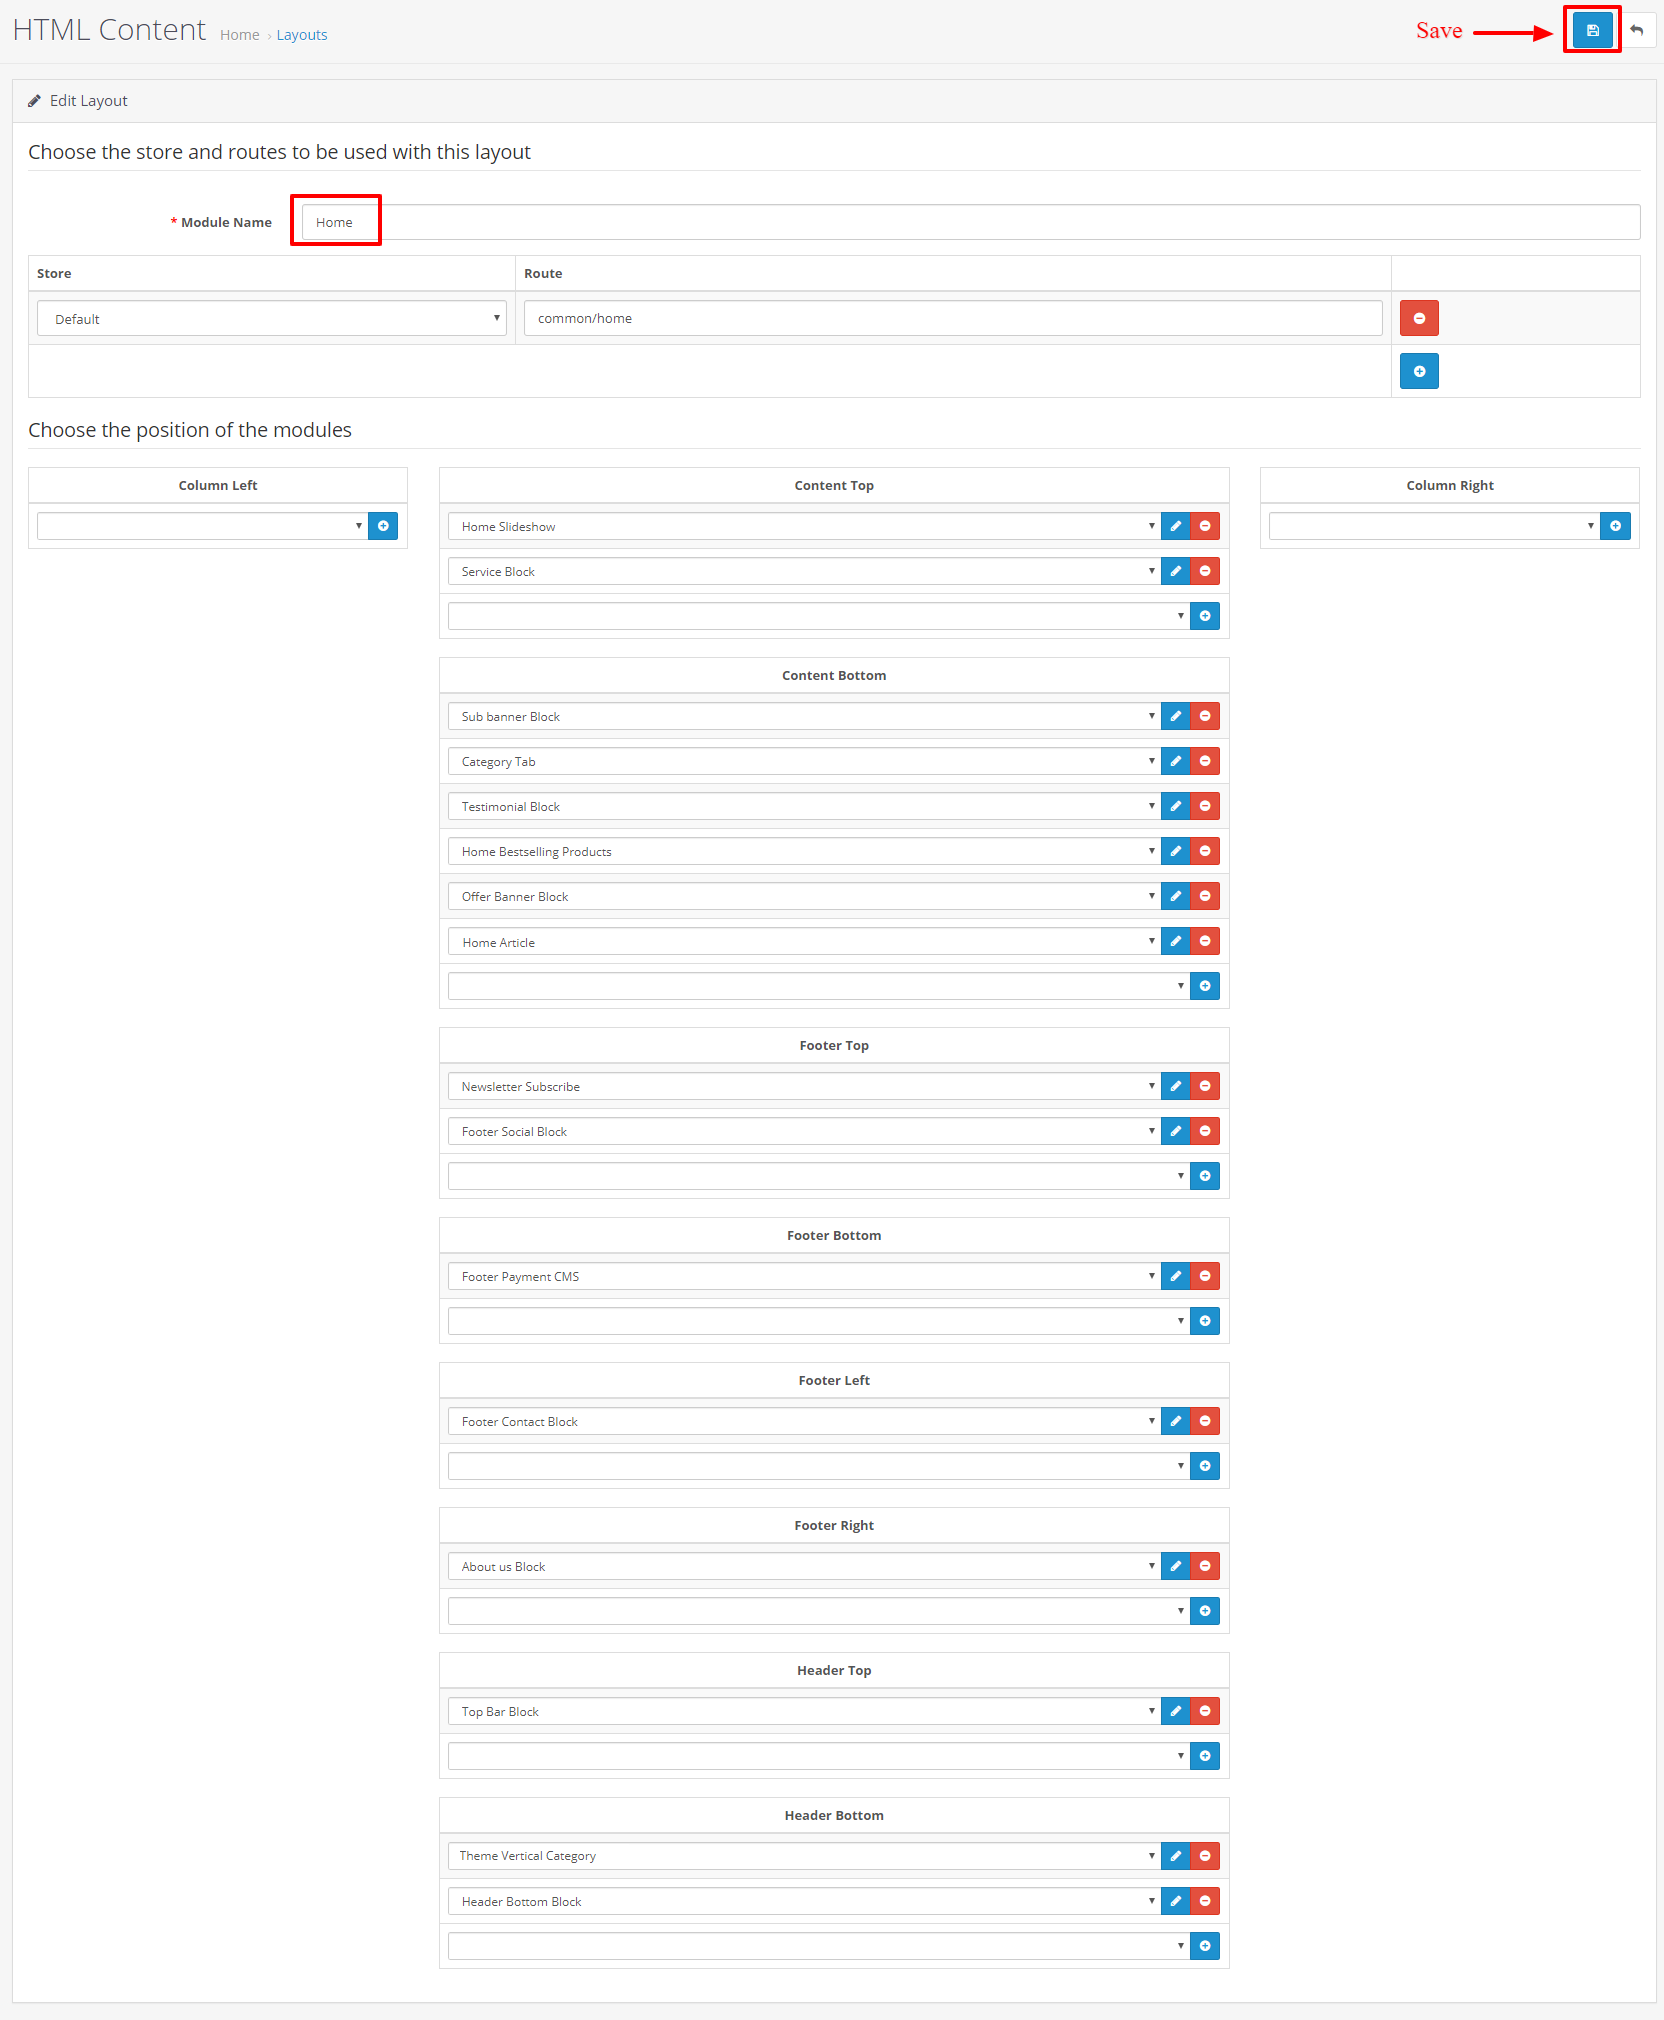
For Layout Setting ,
Go to Design > Layouts
For Home Layout Setting ,
Click on Home layout Edit link, and set as below settings.
-
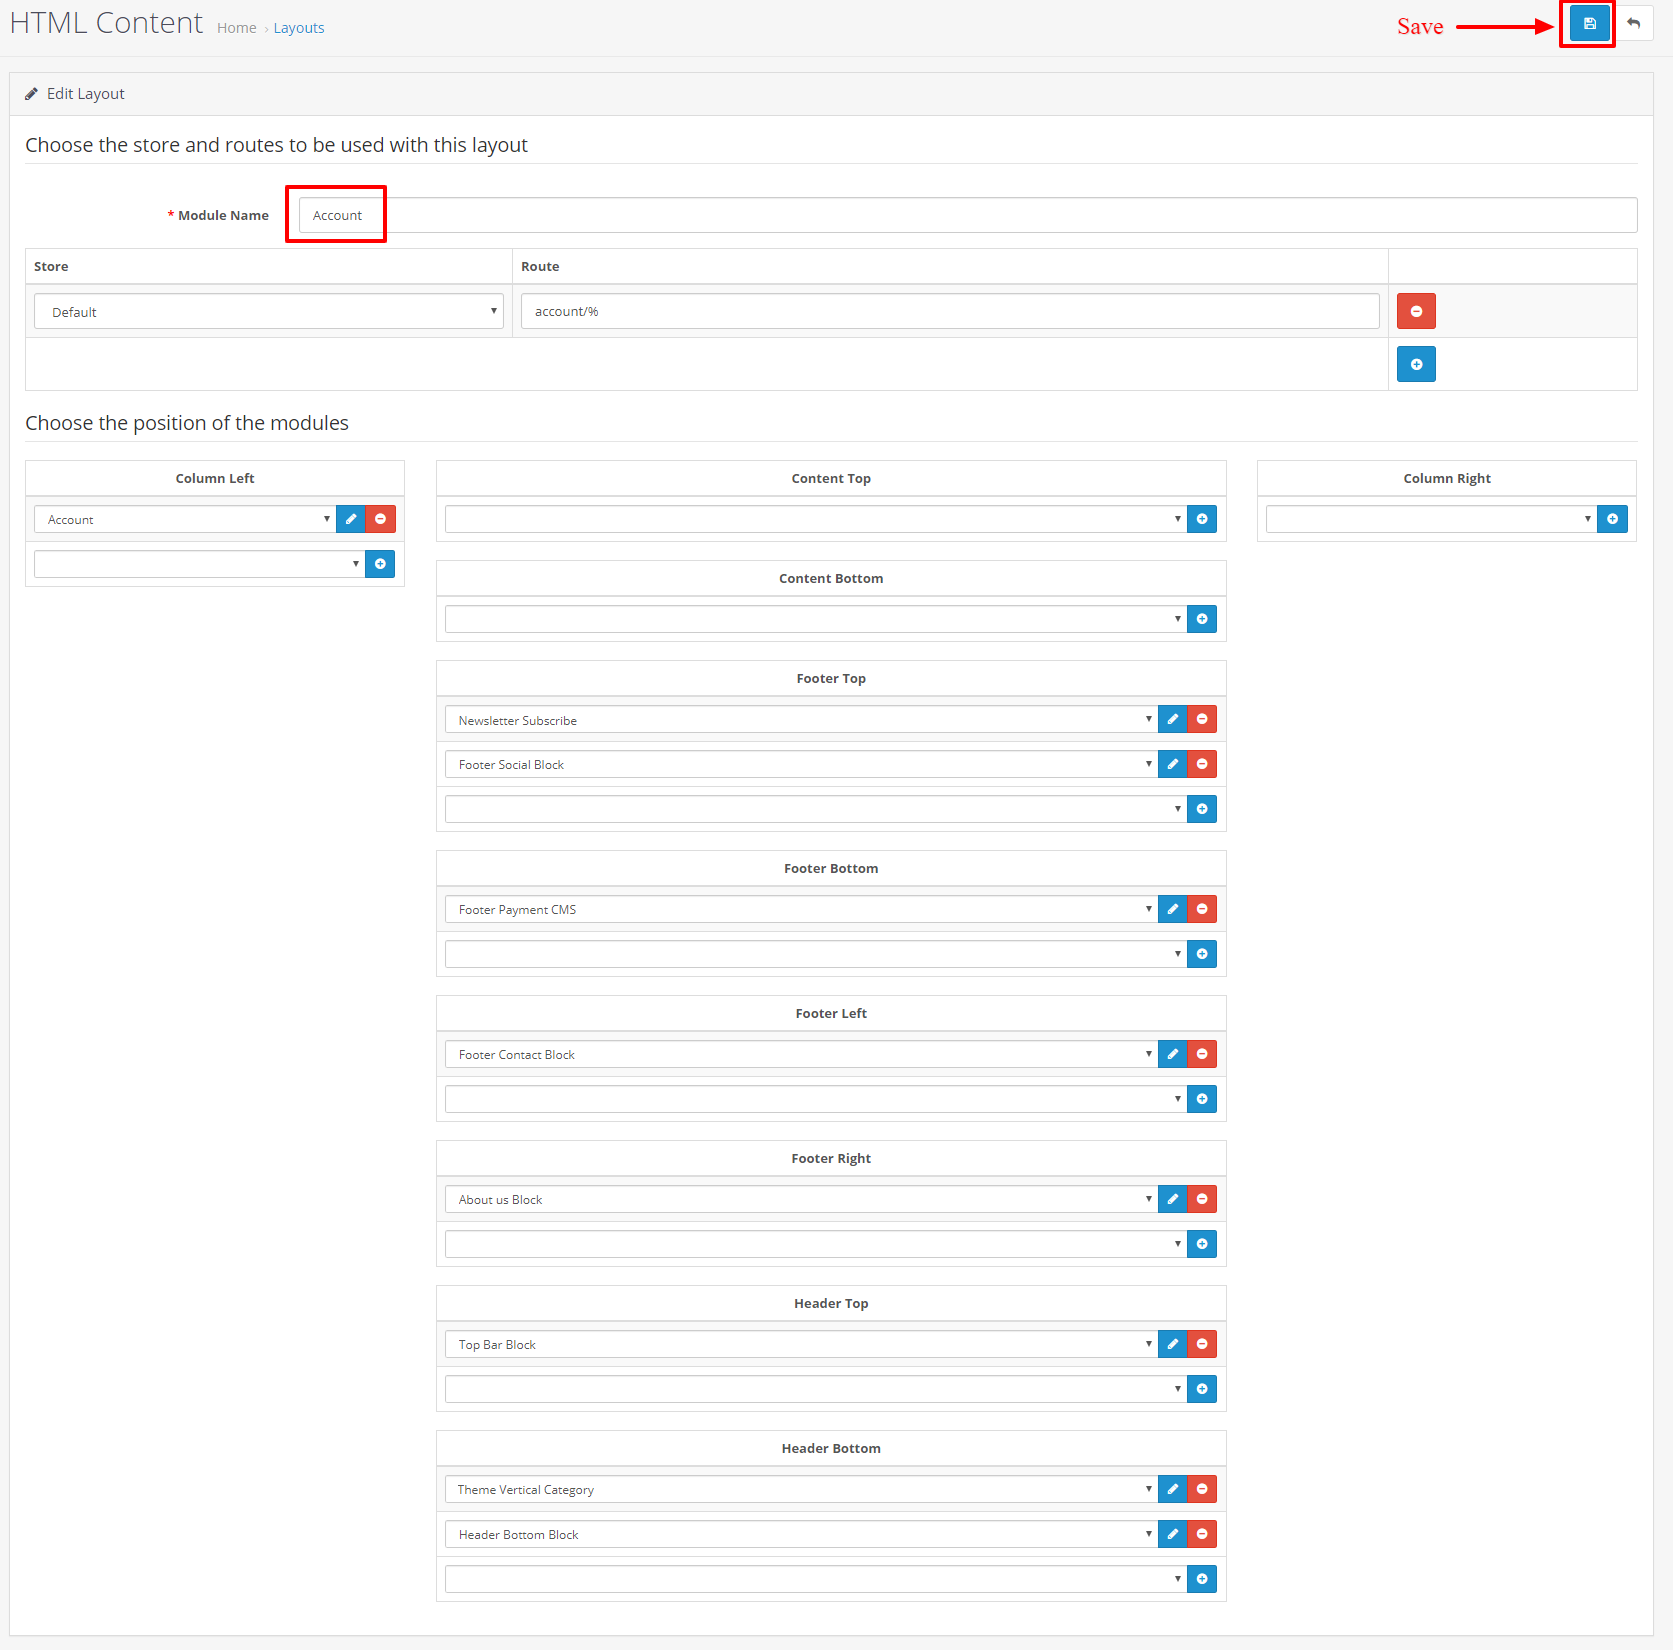
For Account Layout Setting ,
Click on Account layout Edit link, and set as below settings.
-
For Affiliate Layout Setting ,
Click on Affiliate layout Edit link, and set as below settings.

-
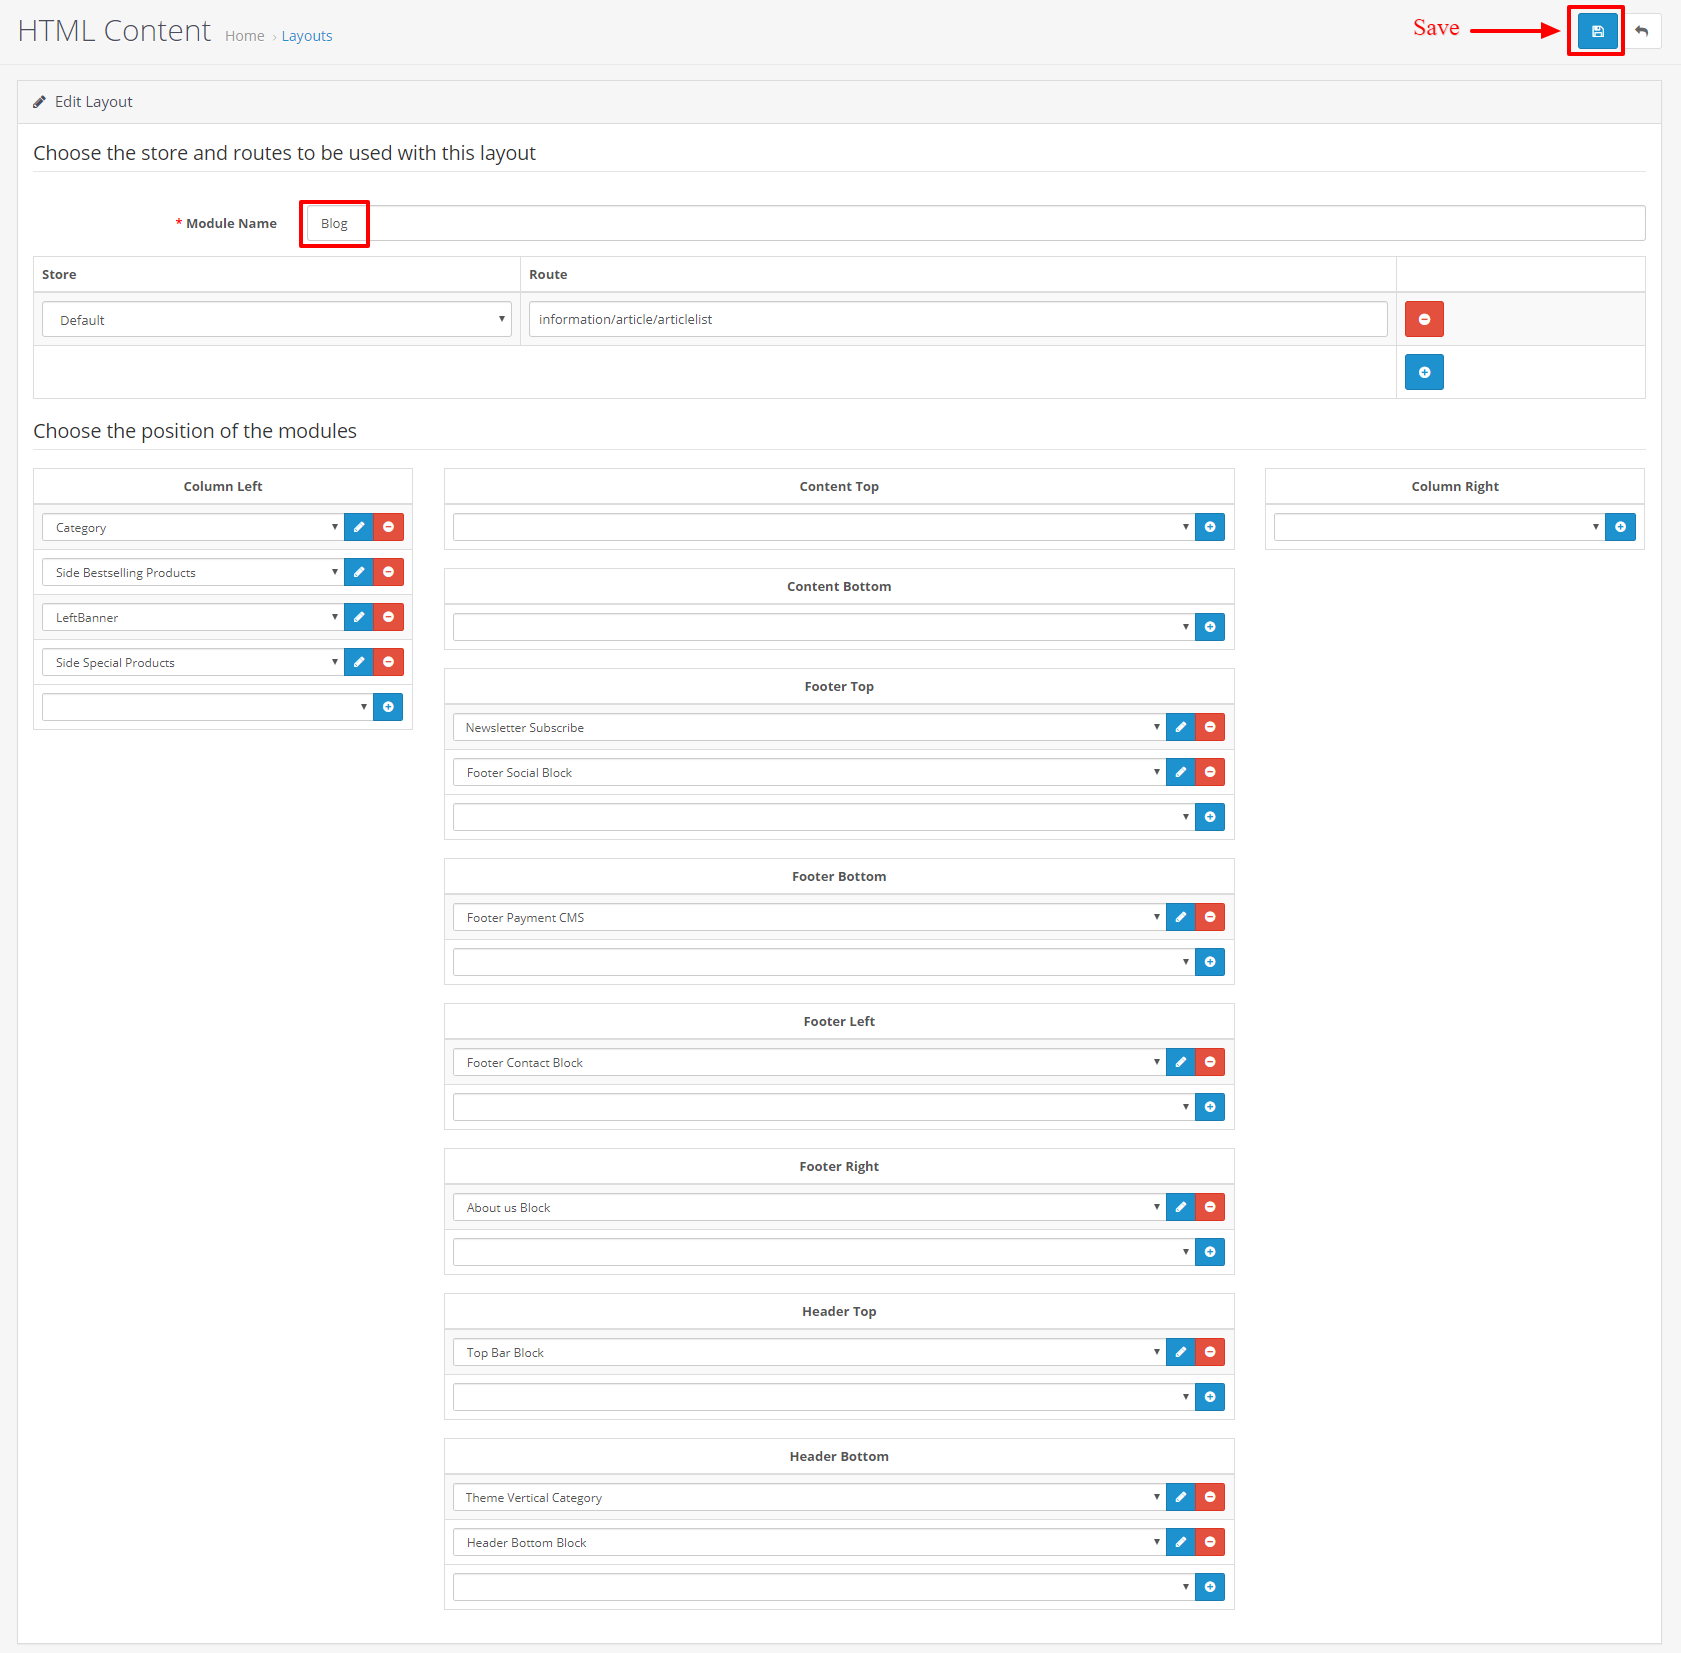
For Blog Layout Setting ,
Click on Blog layout Edit link, and set as below settings.
-
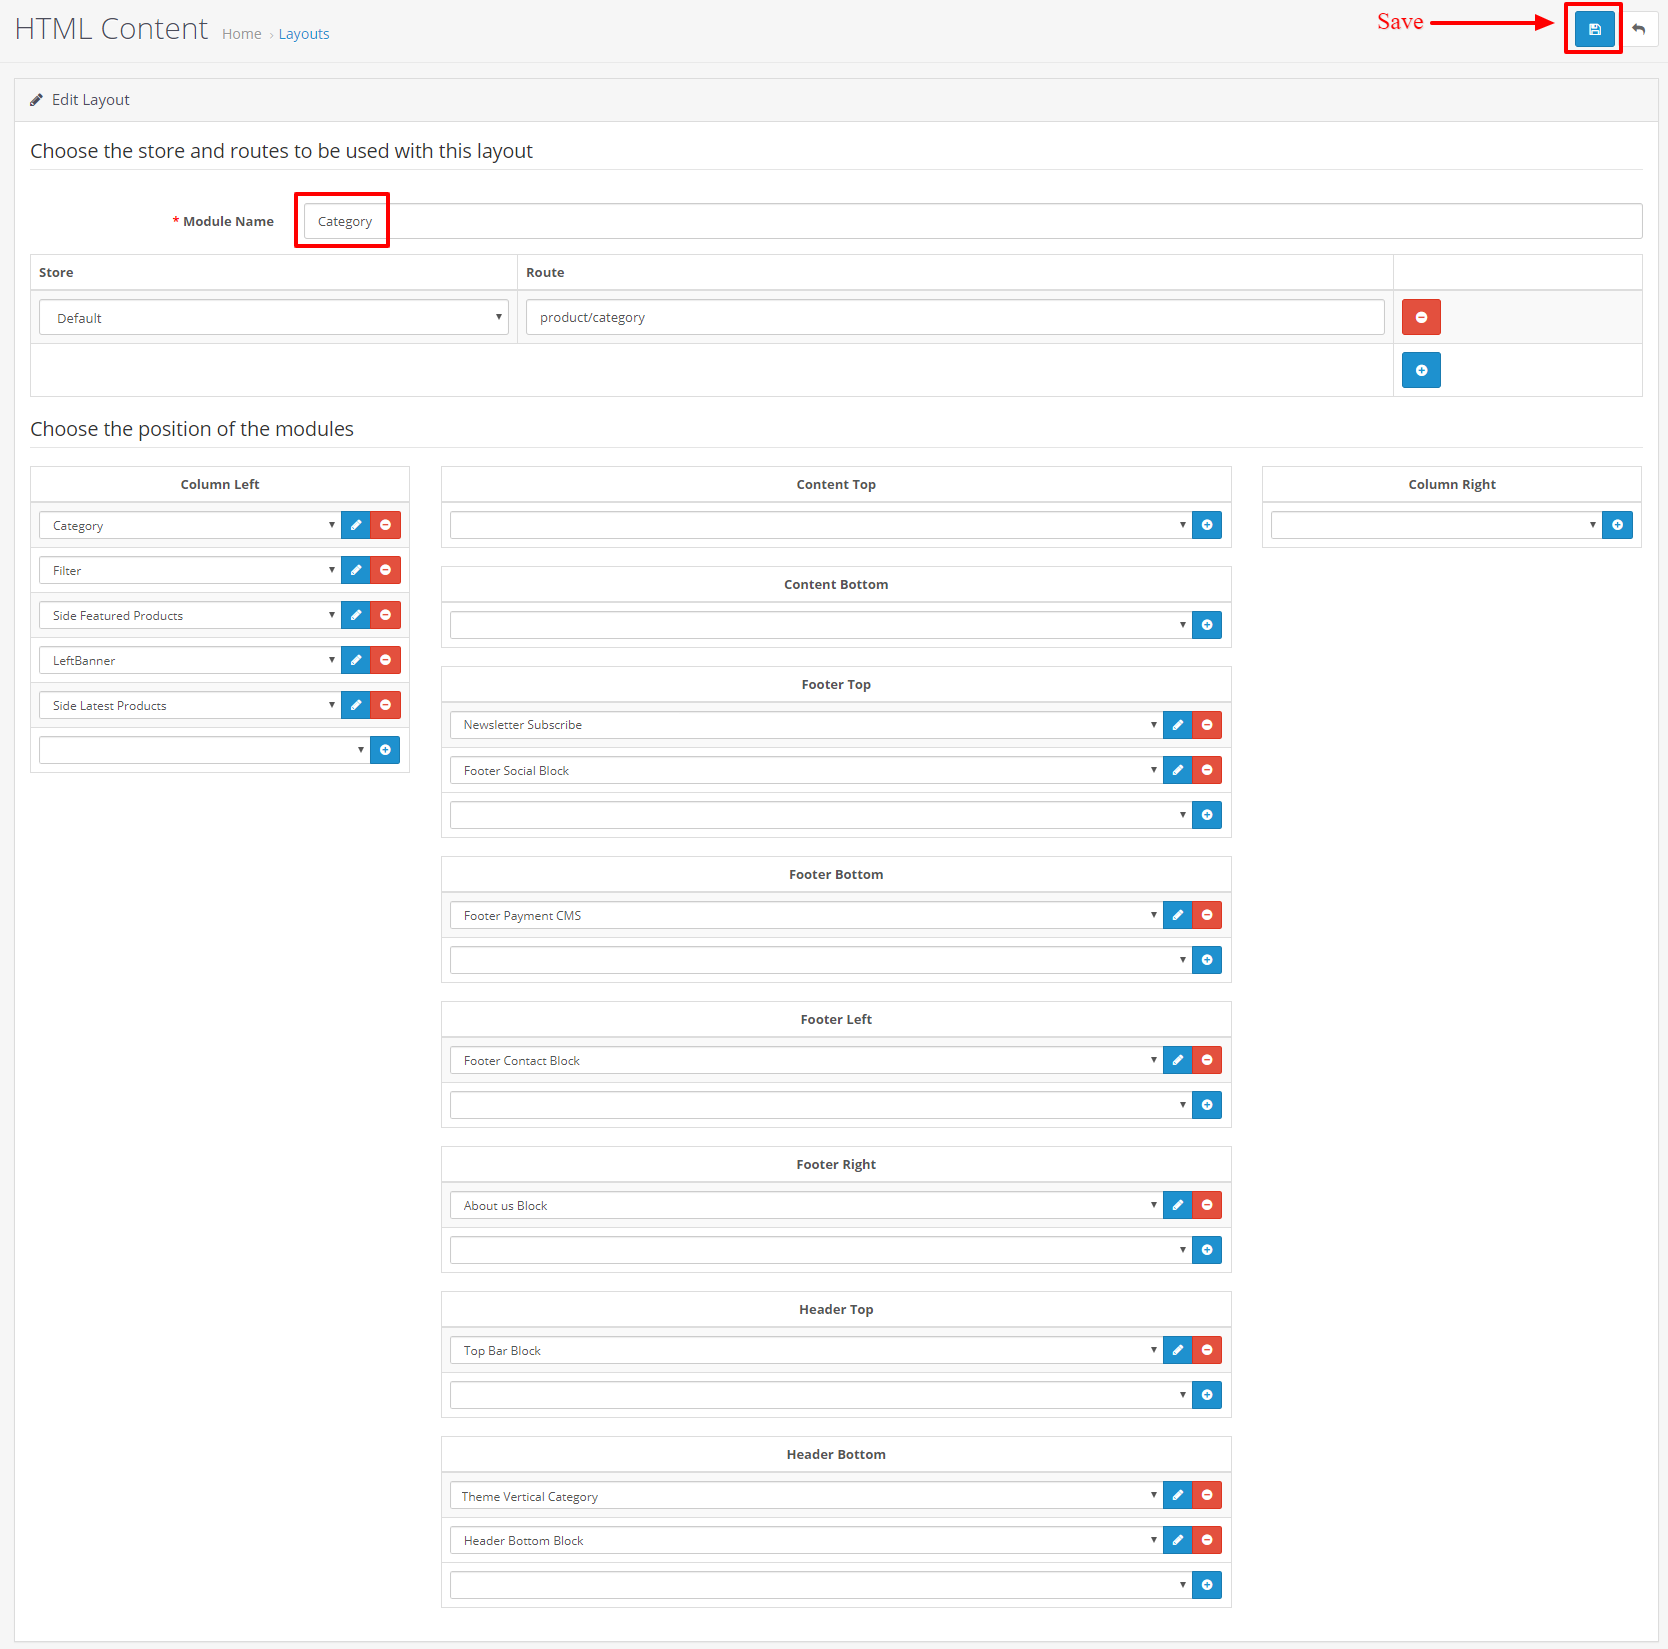
For Category Layout Setting ,
Click on Category layout Edit link, and set as below settings.
-
For Checkout Layout Setting ,
Click on Checkout layout Edit link, and set as below settings.

-
For Compare Layout Setting ,
Click on Compare layout Edit link, and set as below settings.

-
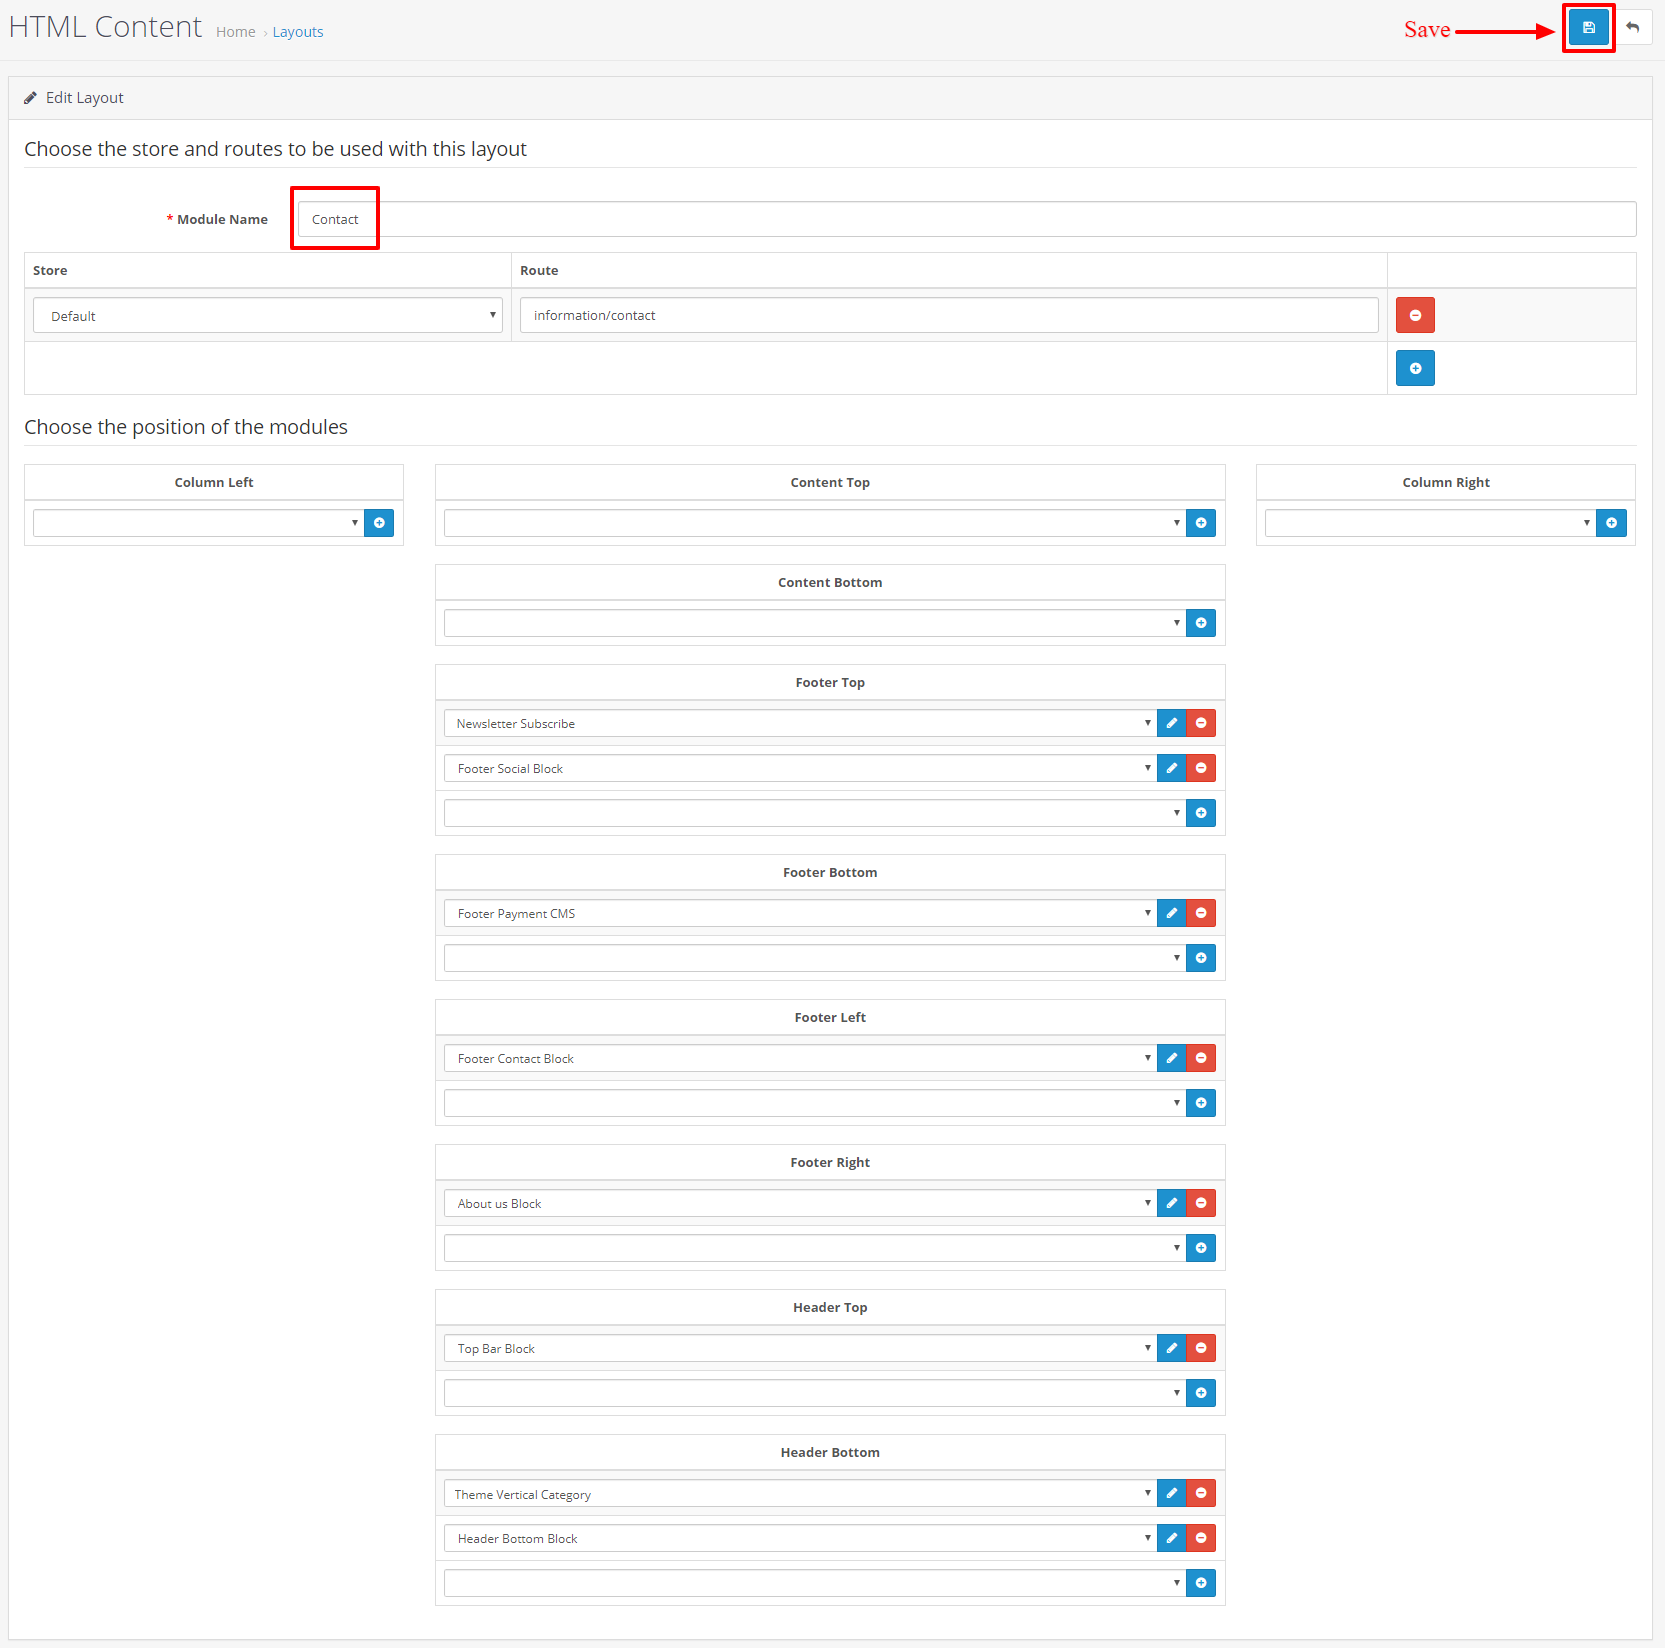
For Contact Layout Setting ,
Click on Contact layout Edit link, and set as below settings.
-
For Default Layout Setting ,
Click on Default layout Edit link, and set as below settings.

-
For Information Layout Setting ,
Click on Information layout Edit link, and set as below settings.

-
For Manufacturer Layout Setting ,
Click on Manufacturer layout Edit link, and set as below settings.

-
For Product Layout Setting ,
Click on Product layout Edit link, and set as below settings.

-
For Search Layout Setting ,
Click on Search layout Edit link, and set as below settings.

-
For Sitemap Layout Setting ,
Click on Sitemap layout Edit link, and set as below settings.

Help
Thank you for purchasing this theme. If you have any questions that are beyond the scope of this help file, feel free to contact us via our Support ticket system.